Table of Contents
1. Overview
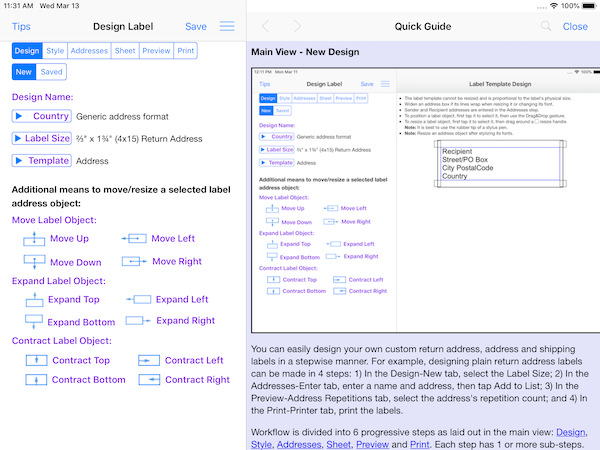
When the app is launched, the following initial view is displayed:
The screen is split into 2 panels. The left panel is where design actions are made while the right panel is where the results of those design actions are displayed. The right panel is also used to display documentation and selection lists, like Contacts, saved address lists and saved designs.
Design workflow is a series of progressive steps, each with 1 or more sub-steps. In the view above, the initial step is the Design step and its New sub-step. Simply tap a step or its sub-step to change to another (sub-)step. Doing so will change the display underneath the steps and possibly the content of the right panel. You can go back to a step at any time and make design changes that are applied and propagated immediately. You can also skip ahead a step, for example, construct your address list in the Addresses step first.
When the app is launched, a set of default design decision have been selected, e.g., the size of the label, an address template and textual properties like font, font style and text color. Each can easily be changed during the design workflow.
Label addresses are not entered into a label, but addresses from various sources are placed in an address list that is applied to a label sheet. A repetition count can be set for each address that specifies the number of times that address is replicated on the label sheet.
Above the step segment buttons is a Navigation bar:
- Tips button: Each step and sub-step has tips to guide and clarify actions to take. Tap the Tips button to display the tips popover. Tap anywhere outside the popover to close it. For example, here is the Tips popover for the Design step:
- Title: The center of the navigation bar is a description of the selected step.
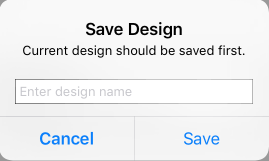
- Save button: Select the Save button at any time during the label’s design to name and save the design to your device. It can be restored in another session. The Save button turns orange when any changes have been made to the design. This serves as a reminder changes were made that should be saved; otherwise, they will be lost if the app is shut down.
In the Save dialog enter the name of the design: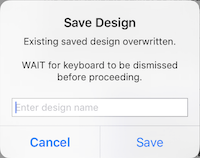
If the design is successfully saved, the acknowledge message “Design Saved” will appear briefly on the screen and the color of the Save Button changed back to blue.
If saving a design with an image, the size of the image must be < 16MB; otherwise, a warning dialog is displayed.
WARNING: If you delete the app, all data associated with it is deleted, namely, all of your saved designs and address lists, CSV files and PDF files.
- Menu button: Select the menu icon (
 ) to display the menu popover from which you can access the Quick Guide and User Guide, take a quick tour of the app, send e-mail feedback to the developer or rate the app in the App Store, for example.
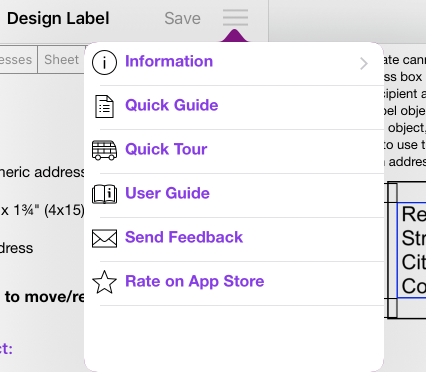
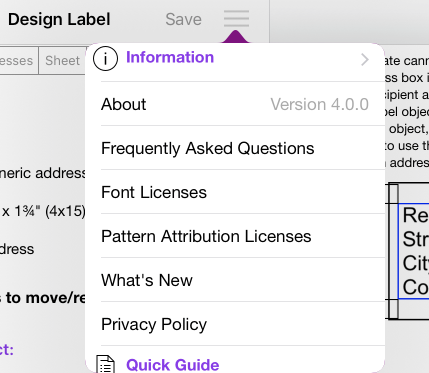
Tap Information to expand it. From there you can learn About the app, display the Frequently Asked Questions and explore their answers, view the Font Licenses for the non-iOS fonts, view the Pattern Attribution Licenses for the background patterns and learn What’s New in every released version of the app.
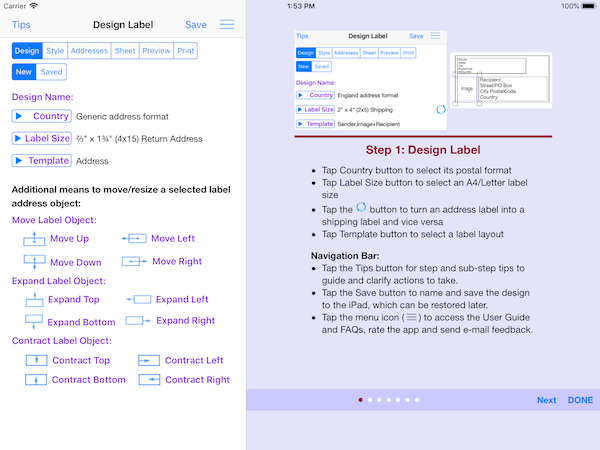
Tap Quick Guide to display the Quick Guide and quickly learn about the app’s features and how to use them.
Tap Quick Tour to see all of the app’s features briefly explained. To navigate between pages, swipe left or right. To advance a page, tap Next. Tap Done when finished.
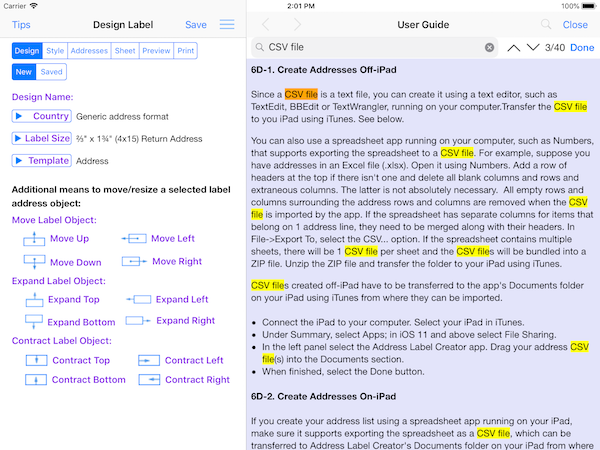
Tap User Guide to display the User Guide, which contains a Table-of-Content. Tap the search icon (to the left of Close) and the search view will be displayed. Tap the search bar and enter the keyword or phrase search criteria. Use the Next and Previous arrows to move to the next/previous occurrence. Occurrences of the keyword or phrase are highlighted in yellow. The current occurrence is highlighted in orange. Tap Done when finished and the search view will concealed.

2. App Features
- Supports all Avery A4 and Letter return address, address and shipping label sheets. Supports all Herma and Unistat rectangular A4 label products.
- Can select a provided label template for address and shipping labels.
- An address label can be turned into a shipping label and vice versa.
- A return address and address label can be monogrammed.
- Can use any available iOS font and its font styles for text.
- The first line of an address can have its own font, font style and color distinct from those of the remaining lines.
- A color for text, an address line separator, a label border and a label background can be any color selected from a color wheel or entered as a hexadecimal number.
- Can select images from iPad’s Photos or supplied clip art.
- Can add a border to labels of varying thickness and of any color.
- Can add a color or photo as the label’s background. Their opacity (transparency) can be varied. Their coverage can be the entire label or just around the label’s objects. The background color can be any color.
- Address line separator in shipping labels can be of varying thickness and length, and of any color.
- Address list can be constructed from various sources: contacts, a saved address list, a CSV spreadsheet.
- Address list can be saved on device and used later in another label design or cleared when starting a new design.
- Address list can be printed or exported to a CSV spreadsheet.
- Design can be saved on iPad at any time during the workflow and restored in a later session.
- Can preview label sheet before printing to verify accuracy of labels content. Can print label sheet with outlined labels, which can be overlayed on a label sheet to check label content lines up correctly.
- Can adjust the label sheet’s margins to compensate for any misalignments.
- Can mark unusable labels on 1st sheet.
- Can print label sheets to an AirPrint enabled printer.
- Can save label sheets to a PDF file on the device or e-mail as a PDF for printing later or elsewhere.
- Quick Guide and User Guide documents on how to use the app and its features, including how to best print the label sheet’s PDF and do borderless printing. Includes a section of Frequently Asked Questions (FAQs). Can be searched for keywords and phrases.
- Quick Tour of the app, available on-demand, that briefly explains its features.
3. Picking a Color
There are 4 instances where you can pick a color: 1) for text; 2) for an address line separator in a shipping label; 3) for the label background and 4) for the label border. In each case you can select any color using a color wheel or enter the hexadecimal value of a color. The latter is useful if you are trying to match a color in, for example, a company logo. There are tools you can use to obtain the hexadecimal value of a color, which usually provide a pixel magnifier that can be moved over an image.
Consider the example of changing the color of address text:
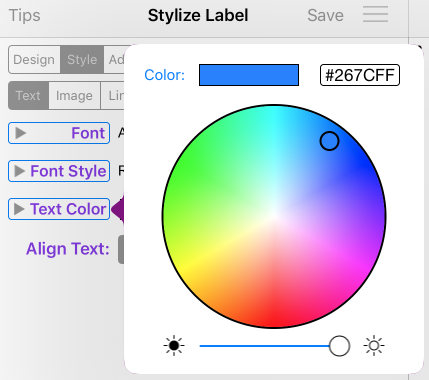
To pick a color, Drag&Drop the color knob around the wheel or tap a color within the wheel. Then slide the brightness knob left to darken the selected color or right to lighten it. Note: Black is the brightness knob positioned to the far left. Notice the selected color and its hexadecimal value are displayed as the color knob is moved around.
To reinstate the color displayed, tap the color knob. This occurs, for example, when switching from a background photo to a background color previously selected.
To enter the hexadecimal value of a color, tap the displayed hex value and a hex pad will be displayed:
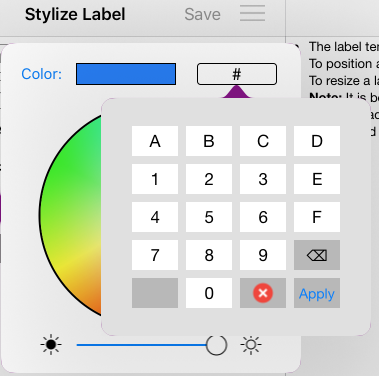
- When the hex pad is displayed, the current hex value is cleared except for the #.
- You can enter up to 6 hex digits. It is not necessary to enter leading zeros.
- To delete the last entered hex digit, select the ⌫ key. You can delete up to the #.
- When you are finished entering the hexadecimal value, select the Apply key and the color will be applied to the address text. The color knob in the color wheel will be positioned on the entered color. Applying an empty hexadecimal value is equivalent to #000000, which is the color black.
- Select the cancel key (
 ) and the entered value will be ignored. The hexadecimal value will revert to the value of the selected color as determined by the position of the color knob.
 - Tapping outside the hex pad is equivalent to cancel and the hexadecimal value will revert to the value of the selected color as determined by the position of the color knob.
4. Step 1: Design Label
The first step in the design workflow is to either start a new label design or restore a saved design.
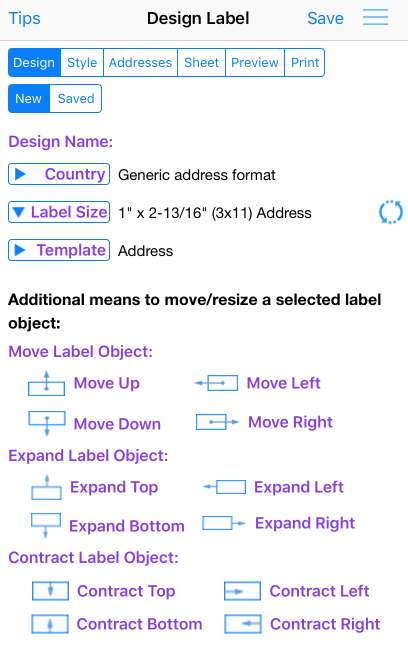
The buttons with a right pointing arrow are selection buttons, i.e., when tapped a popover with a list of choices is presented.
Tap the  button to turn an address label into a shipping label and vice versa. The button is not displayed for a return address label.
When the design is saved, the name of the design is displayed to the right of “Design Name:” and the acknowledge message “Design Saved” appears briefly on the screen.
4A. New Label Design
When starting a new design, you have to select a country postal address, the size of the address label and a label template.
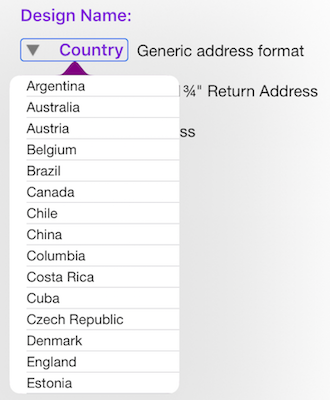
- Select Country Postal Format: Tap on the Country button and from the scrollable country list popover, select a country.The selected country specifies its international postal address format, which is displayed in the selected label template in the right panel. There are predefined postal address formats for 58 countries. Use the postal address format as a guide for what is expected for that country.
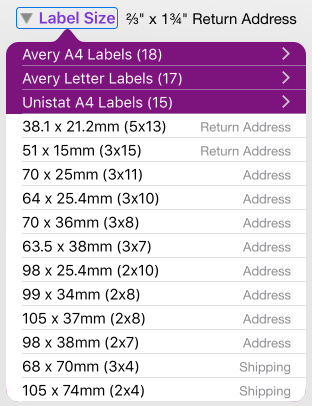
- Select Label Size: Tap on the Label Size button and in the popover, select the Avery A4 Labels, Avery Letter Labels or Unistat A4 Labels category. The category will be expanded to display all A4 or Letter return address, address or shipping label sizes. A4 and Letter label sizes are as shown on sheet products. Label sheet products for the selected label size are listed in the Sheet step.
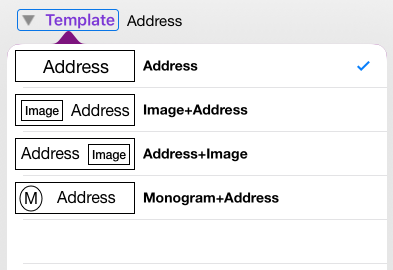
- Select Label Template: Tap the Template button to select a provided label template. The list of templates in the popover depends on the label type. Address labels and Shipping labels have a separate set of templates. Here is the list for (return) address label templates:
When the label size is changed, the design style’s are propagated to the new label template if the new label type is compatible with the old label type; otherwise, the design style’s are reset to their defaults. Address and return address labels are incompatible with shipping labels, but are compatible with themselves.
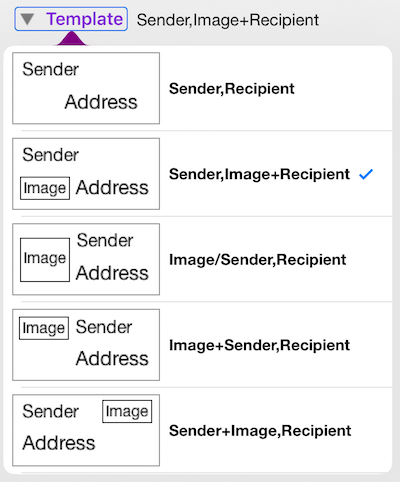
Here is the list of shipping label templates; 2 more have a line between the sender and the receiver of the 3rd and 5th template which can be seen by scrolling the list up:
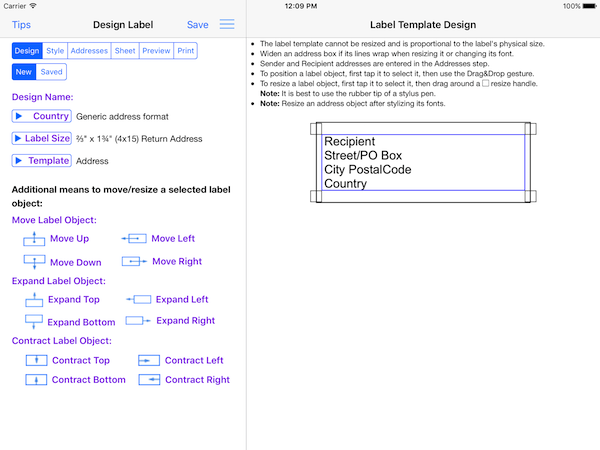
The selected label template is displayed in the right panel. Take for example the following shipping label template:
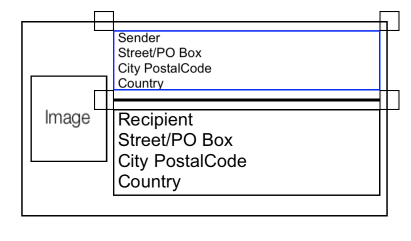
The boxes inside a label template are referred to as objects. There are four types: address objects, image objects, monogram objects and line objects. When the template is drawn, one of the address objects is automatically selected. It is outlined in blue and has attached resize handles (
 ). Address, image and monogram objects have 4 handles attached to their corners; a line has 2 handles attached to its ends.
The label template cannot be resized and is proportional to the label’s physical size.
Each label object has its own set of properties. To set or change a label object’s properties, simply tap it and then go to the object’s sub-step in the Style step where the properties are displayed. Changes are immediately displayed in the label template.
The label template can have a background color or photo and a border, both can be set in the Style step.
Addresses are not directly entered into address objects. Instead Sender and Recipient address are entered in the Addresses step.
4B. Restore Saved Design
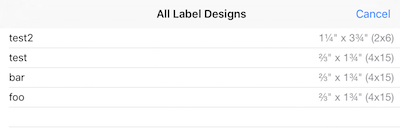
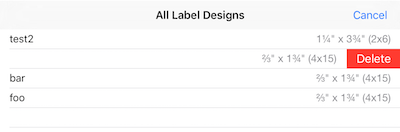
To restore a design previously saved to the iPad, select the Saved sub-step. A list of saved designs will be displayed in the right panel; select 1 to restore it.
When a label design is restored, control is given to the Style step and its sub-step set to match the selected label object.
To delete a saved design, Swipe left on a saved design to expose its Delete button. Tap Delete to delete it from the iPad and the list. Swipe right to cancel and dismiss the Delete.
Before restoring a design, if the current design has changed, a dialog is displayed giving you the chance to save it first.
4C. Position and Resize Label Objects
Note: Position and resize address label objects after stylizing their fonts.
There are 2 ways to position and resize a label object: using gestures and tapping button controls.
- Gesture Controls
- To position a label object, first tap it to select it, then use the Drag&Drop gesture to move it into position. To move a line, Drag&Drop the line. To move an address/image object, Drag&Drop it.
- To resize a label object, first tap it to select it, then drag a resize handle ( ) in any direction. Note: It is easier and best to use the rubber tip of a stylus pen.
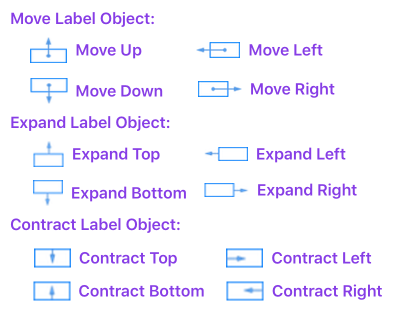
- Button Controls: The position and resizing buttons provide greater accessibility to their gesture counterparts.
- To position a label object, first tap it to select it, then tap one of the Move buttons 1 or more times. Each tap moves the label object a fixed amount.
- To resize a label object, first tap it to select it, then tap one of the Expand or Contract buttons 1 or more times. Each tap resizes the label object a fixed amount.
Widen an address box if a line wraps when resizing it.
5. Step 2: Stylize Label
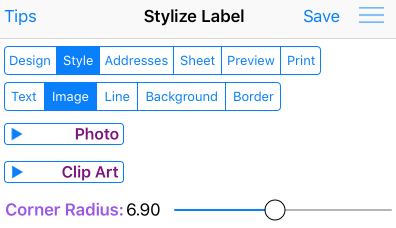
In the Style step, you can select textual properties to a selected address object, add an image to a selected image object or add a border to the label. The choices are immediately applied to the label template in the right panel.
Each address object has its own sets of textual properties – one set for the first line and one set for the remaining lines. A set consists of a font, font style and text color. The initial text properties are those of the selected label size’s defaults.
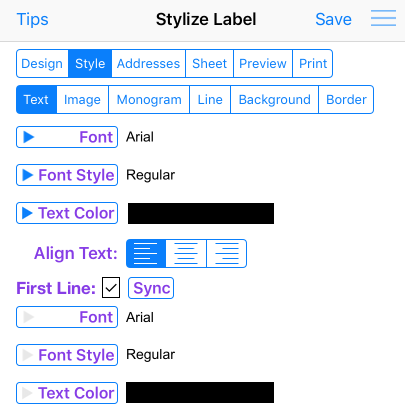
If the first line’s text properties are synced with the remaining lines, all lines have the same text properties. The default is synced indicated by the checked checkbox (
 ). Tap the Sync button to change to not synced; the check mark is replaced with an X. Tap again to change to synced. When the text properties are synced, the first line’s text property controls are disabled and enabled when the text properties are not synced.
Selecting the Text/Image/Monogram/Line sub-step causes the Recipient/Image/Monogram/Line object, respectively, in the label template to be selected.
Selecting the Recipient/Image/Monogram/Line object in the label template causes the Text/Image/Monogram/Line sub-step, respectively, to be selected.
5A. Select Text Properties
Text property changes are applied instantly to the selected address textbox. There is no font size property. The print font size is determined by the size of the address textbox, which can be changed by resizing the textbox.
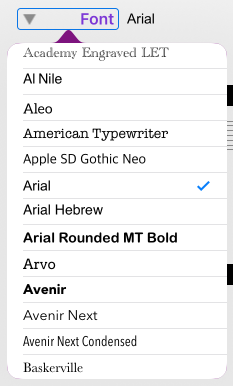
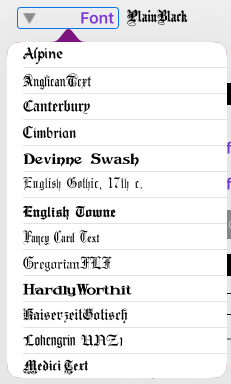
- Select Font: Tap the Font selection button to select an iOS font from the scrollable popover list of fonts, which consists of iOS fonts and 28 non-iOS fonts. Each font has its own set of font styles; a default font style is selected. Note: The names of the fonts are displayed in their font.
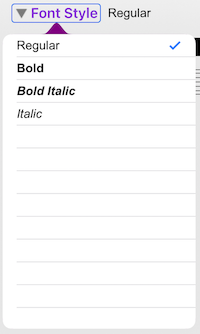
- Select Font Style: Tap the Font Style selection button to select from the scrollable popover list of font styles 1 of the selected font’s font styles. Note: The names of the font styles are displayed in their font.
- Select Text Color: See Picking a Color.
- Set Alignment: Text can be aligned within an address textbox by tapping 1 of the alignment buttons. Options are left justified, center and right justified.

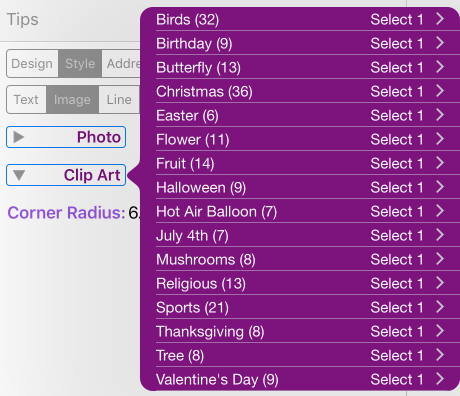
5B. Add Photo/Clip Art
To add an image to the label template, select the image object and then pick an image from your iPad’s Photos or the supplied clip art.
When an image is added to an image box, the image box is resized so the
image fits while maintaining its aspect ratio. When resizing the image box
using its resize handles, maintain the aspect ratio so the image does not
become distorted. To position the image within the label template,
Drag&Drop it.
- Select Photo: Tap the Photo selection button to select a photo on your iPad from the popover. Note: The design cannot be saved if the size of the photo is greater than 16MB.
- Select Clip Art: Tap the Clip Art selection button to select a clip art category from the popover. Select 1 of the categories and it will be expanded to show its clip art images; select 1 Note: The last few clip art categories are automatically scrolled to their first row when selected. Scroll up to see all of the rows.
- Round Image’s Corners: The image’s corner radii can be set to any contiguous number between 0 and 15 using the radius slider control. As the slider’s knob is moved, its value is displayed to the left of the slider control.
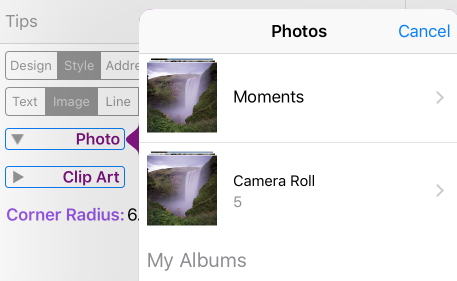
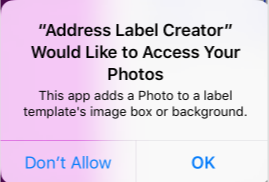
The first time you tap the Photo selection button, the app will ask you if it can access your Photo library.
5C. Select Monogram Properties
For a return address or address template that has a monogram, the monogram’s font, letter and color can be selected. Also, the monogram can be encased in a frame whose shape can be a circle or an oval. The frame’s border can be of varying thickness and any color and be filled with any color. These controls are only enabled when the template has a monogram object.
All monogram property changes are applied instantly to the label template.

- Select Monogram Font: Tap the Font selection button to select a monogram font from the scrollable popover list of fonts. The names of the fonts are displayed in their font. Tap a font to select it.
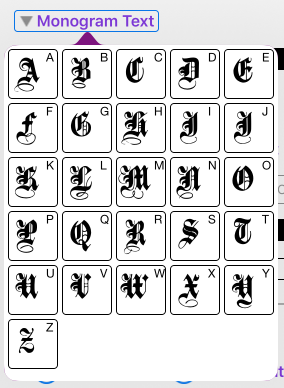
- Select Monogram Text: Tap the Monogram Text selection button to select a monogram letter. The letters of the alphabet are displayed in the selected monogram font. Tap a letter to select it.
- Select Monogram Color: The monogram text can be any color. See Picking a Color.
- Position Monogram: The monogram can be repositioned within the frame shape by tapping the appropriate shift button multiple times. Each tap moves the monogram a fixed amount. Note: Position the monogram last after setting all of the other properties for some will cause its position to change.
- Select Frame Shape: The monogram can be encased in a circle or oval, or not at all. Tap None for no frame, Circle/Oval for a circle/oval shaped frame.
The following frame controls are only enabled if there is a frame shape, i.e., circle or oval.
- Select Frame Color: The frame’s border can be any color. See Picking a Color.
- Select Frame Fill Color: The frame’s interior surrounding the shape can be filled with any color. See Picking a Color.
- Select Frame Shape: The monogram can be encased in a circle or oval, or not at all. Tap None for no frame, Circle/Oval for a circle/oval shaped frame.
- Select Frame Thickness: The frame’s border thickness can be set to any contiguous number between 0.5 and 5.0 using the thickness slider control. As the slider’s knob is moved, its value is displayed to the left of the slider control.
- Resize Frame Shape: The width and height of the frame can be increased and decreased by tapping their incr/decr buttons. Each tap changes the size a fixed amount.
5D. Select Line Properties
For a shipping template that has a line, the line’s thickness and color can be changed. These controls are only enabled when the template has a line.
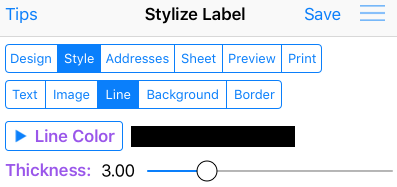
- Select Line Color: See Picking a Color.
- Set Line Thickness: The line’s thickness can be set to any contiguous number between 1.0 and 10.0 using the thickness slider control. As the slider’s knob is moved, its value is displayed to the left of the slider control.
5E. Add Background Color, Photo or Pattern
To add a background color, photo or pattern to the label template, select the Background sub-step and then select the Color, Photo or Pattern background option. If the option is already selected, tap it again to select a different color/photo/pattern.
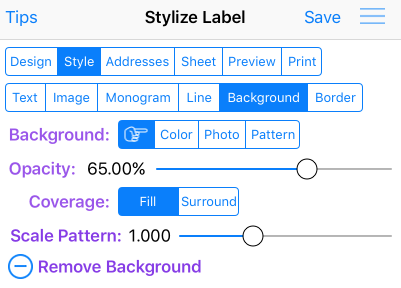
Background property controls are disabled until the Color, Photo or Pattern background option is selected.
The background opacity/transparency can be any continuous number between 0 and 1. Its value is expressed as a %. The default opacity for a color is 1.0, for a photo 0.5 and for a pattern 0.65.
The background can fill the entire label or just surround the label’s objects, i.e., their internal background is white.
To remove the background, tap the remove  button or tap the No Background (
  ) option.
It is not necessary to remove a background before selecting a different background.
- Select Background Color: See Picking a Color.
- Select Background Photo: Tap the Photo option to select a photo on your iPad from the popover. Note: The design cannot be saved if the size of the photo is greater than 16MB.
- Select Background Pattern: Tap the Pattern option to select a pattern from the popover.
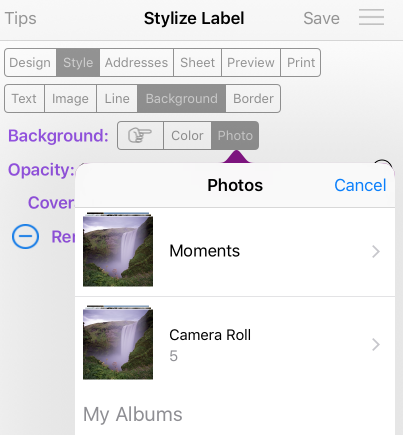
The first time you tap the Photo selection button, the app will ask you if it can access your Photo library.
It is best if the photo has the same aspect ratio as the label. For example, if the label has a wide width and narrow height the photo should be the same. Otherwise, the photo will be distorted in one dimension. To minimize distortion, the background photo is resized proportionally, if its dimensions are bigger that the label, so 1 dimension fits the label.

The selected background pattern can be scaled from 1/2x to 2x in steps of 1/8 by moving the Scale Pattern slider, which is only enabled when there is a background pattern. Some values may stretch the height or have little affect. The default scale factor is 1.0, i.e., no scaling of the selected pattern.
A pattern is sized so an integral number fit the width of the label template. This number will be different for the printed and reviewed label. Check the Preview step, Review sub-step for the true spread.
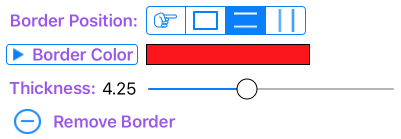
5F. Add Border
To add a border to the label, select the Border sub-step and then select the position of the label. The border can be on all 4 sides, the top and bottom or the left and right sides. Once the Border Position has been selected, the remaining border controls will become enabled.
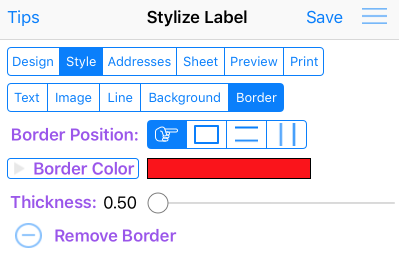
- Select Border Color: See Picking a Color.
- Set Border Thickness: The label border’s thickness can be set to any contiguous number between 0.5 and 10.0 using the slider control. As the thickness slider’s knob is moved, its value is displayed to the left of the slider control.
- Remove Border: To remove the label border, tap the remove button or tap the No Sides ( ) border option. Removing the border resets the border color and thickness to their defaults and disables the Border Color button, Thickness slider and Remove Border button. The Border Position is reset to No Sides. Note: It is not necessary to remove a border before selecting a different border position.
6. Step 3: Construct Address List
Central to the design of a label is constructing its list of recipient addresses that are applied to the label sheet. The address list can be constructed from various sources: entering it manually, the iPad’s Contacts, a previously list saved to the iPad or a CSV spreadsheet. There should be at least 1 address in the list.

6A. Enter Address
Tap the Recipient address box in the left panel to enter an address; the box’s text will be removed. There is room for up to 7 lines. The recipient address template is that of the selected country; it is only a guide. To change to a different postal address format, select a different Country in the Design step. This allows a label sheet to have a mixture of postal mailing formats.
When finished entering the complete address, dismiss the keyboard (select the Hide Keyboard key). Then select the  button and it will be added to the address list in the right panel if it is not blank in which case it is ignored. Once added, the text in the address box is replaced with a new mailing address template.
For shipping labels, there is a separate Sender address textbox for entering the Sender’s address. Tap the Sender address box to edit its content. When finished editing the address, dismiss the keyboard and it will be applied to all shipping labels and the label template if it is not blank in which case it is ignored. Note: Once a sender address is entered, the country postal format cannot be changed for the sender address object in the label template, i.e., an attempt to change the Country will be ignored.
The Sender address can be set to a contact indirectly as follows:
- Tap the Contacts sub-step and select the Sender’s address from the list of contacts. The selected contact will be added to the address list.
- Tap the added address, then tap Edit. The address will be displayed in the Recipient address box. Press and release anywhere in the address box and in the popover of options tap Select All. In the second popover select Copy. Dismiss the keyboard.
- Tap the Sender address box. Press and release anywhere in the address box and in the popover tap Paste. Dismiss the keyboard.
- Tap the Sender’s address in the address list and then tap Delete.
You can use Siri to enter an address:
- Tap the address box. Its text will be removed and the keyboard displayed.
- On the keyboard, tap the microphone key. Speak the text you want entered, line-by-line. After each line, say “New Line” to start another line. When you are finished, tap Done.
- The translation may not be perfect and needs to be edited.
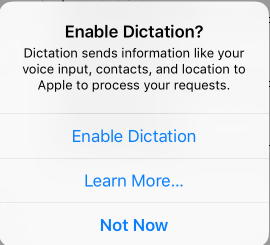
If this is the first time you have ever used the keyboard microphone to dictate a message, you will be asked to grant permission:
6B. Select Addresses from Contacts
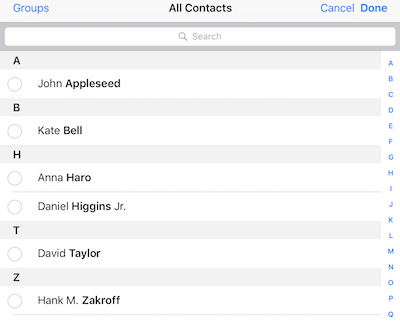
Tap the Contacts sub-step to select Contacts on the iPad with an address, which can be a person or a company. Contacts with an address are highlighted. The Contacts list will be displayed in the right panel. Select 1 or more, then tap Done to add them to the list. Note: An address in the contacts list is formatted by iOS based on its country code.
If a person is associated with a company or a company is associated with a person, the company is the first line of the address followed by the person’s name.
The very first time the app tries to access the Contacts list, you will need to grant the app permission to access it.
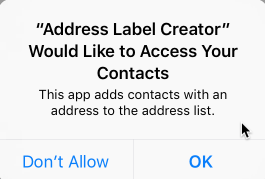
In your iPad’s Settings-Privacy-Contacts, a list of apps that have requested access to your Contacts will be displayed. If the switch for the app is turned off and you try to access Contacts within the app, the following warning message will be displayed:

6C. Select Saved Address List
To add an address list previously saved on the iPad, tap the Saved sub-step. A list of address lists will be displayed in the right panel; select 1 and its addresses will be added to the current address list.
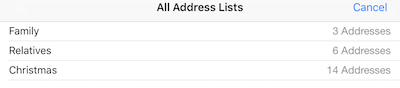
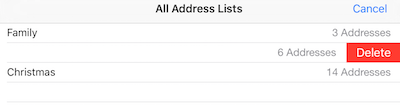
To delete an address list, swipe left on it to expose its Delete button. Tap Delete to delete the address list from the iPad and the displayed list. Swipe right to cancel and dismiss the Delete button.
6D. Import Address List
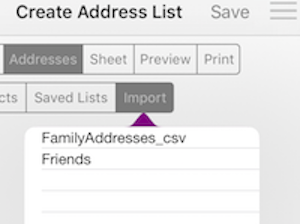
Tap the Import sub-step to select from the popover list from a file in CSV (Comma Separate Values) format. Select 1 file from the list and its content will be added to the Address list.
The CSV file is expected to be in the following format:
Line1,Line2,Line3,Line4
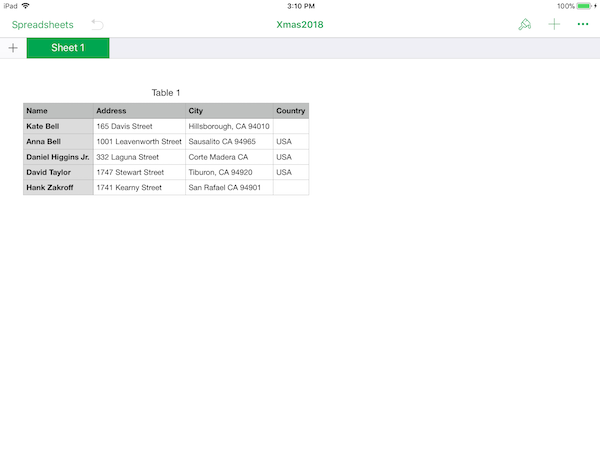
Kate Bell,165 Davis Street,"Hillsborough, CA 94010"
Anna Haro,1001 Leavenworth Street,Sausalito CA 94965,USA
Daniel Higgins Jr.,332 Laguna Street,Corte Madera CA 94925,USA
David Taylor,1747 Steuart Street,"Tiburon, CA 94920",USA
Hank Zakroff,1741 Kearny Street,San Rafael CA 94901 There is 1 address per line with a header line indicating how many comma separated items there are per address. In the example the headers indicates each address is up to 4 items. In an address each line is separated by a comma. If a line contains a comma, then it must be enclosed in double quotes ( ” ). Names should be first name followed by last name.
Note: An address line can have fewer comma separated items than specified by the header line.
To delete a CSV folder/file, swipe left on it to expose its Delete button. Tap Delete to delete it from the iPad and the list. Swipe right or tap anywhere within the table to cancel and dismiss the Delete.
6D-1. Create Addresses Off-iPad
Since a CSV file is a text file, you can create it using a text editor, such as TextEdit, BBEdit or TextWrangler, running on your computer.Transfer the CSV file to you iPad using iTunes. See below.
You can also use a spreadsheet app running on your computer, such as Numbers, that supports exporting the spreadsheet to a CSV file. For example, suppose you have addresses in an Excel file (.xlsx). Open it using Numbers. Add a row of headers at the top if there isn’t one and delete all blank columns and rows and extraneous columns. The latter is not absolutely necessary. All empty rows and columns surrounding the address rows and columns are removed when the CSV file is imported by the app. If the spreadsheet has separate columns for items that belong on 1 address line, they need to be merged along with their headers. In File->Export To, select the CSV… option. If the spreadsheet contains multiple sheets, there will be 1 CSV file per sheet and the CSV files will be bundled into a ZIP file. Unzip the ZIP file and transfer the folder to your iPad using iTunes.
CSV files created off-iPad have to be transferred to the app’s Documents folder on your iPad using iTunes from where they can be imported.
- Connect the iPad to your computer. Select your iPad in iTunes.
- Under Summary, select Apps; in iOS 11 and above select File Sharing.
- In the left panel select the Address Label Creator app. Drag your address CSV file(s) into the Documents section.
- When finished, select the Done button.
6D-2. Create Addresses On-iPad
If you create your address list using a spreadsheet app running on your iPad, make sure it supports exporting the spreadsheet as a CSV file, which can be transferred to Address Label Creator’s Documents folder on your iPad from where it can be imported. If the spreadsheet app does not support export as CSV file, transfer the spreadsheet to Numbers and export it from there.
Suppose you create your address list using Numbers on your iPad. Before you export it as a CSV file, add a row of headers at the top if there isn’t one and delete all blank columns and rows and extraneous columns. The latter is not absolutely necessary. All empty rows and columns surrounding the address rows and columns are removed when the exported CSV file is imported by the app. Also, if the spreadsheet has separate columns for items that belong on 1 address line, they need to be merged along with their headers.
There are 2 ways to transfer a CSV file created by a spreadsheet app to Address Label Creator – via the Copy to Address Label Creator share extension and the Save to Files action (see below). The former is only available in iOS 11 and above.
Copy to Address Label Creator
Suppose the above address list, called Xmas2018, was created using Numbers.
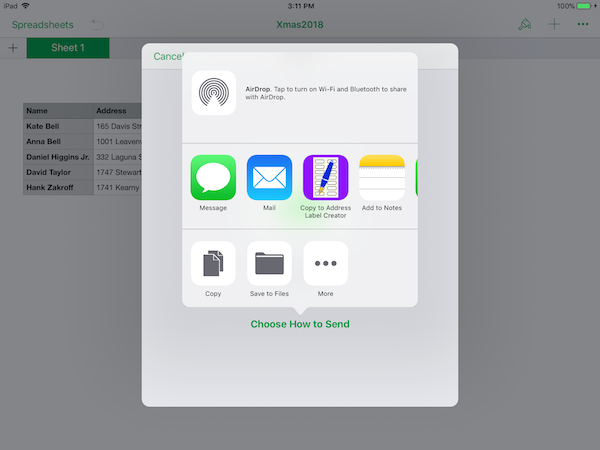
To transfer the spreadsheet as a CSV file to Address Label Creator, start by tapping the … in the upper-right corner.
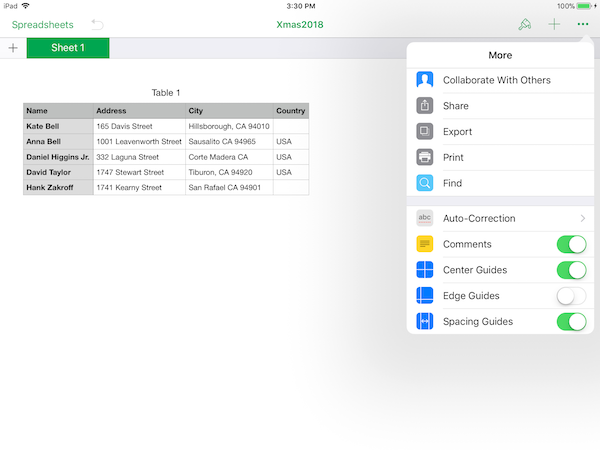
Then select Export
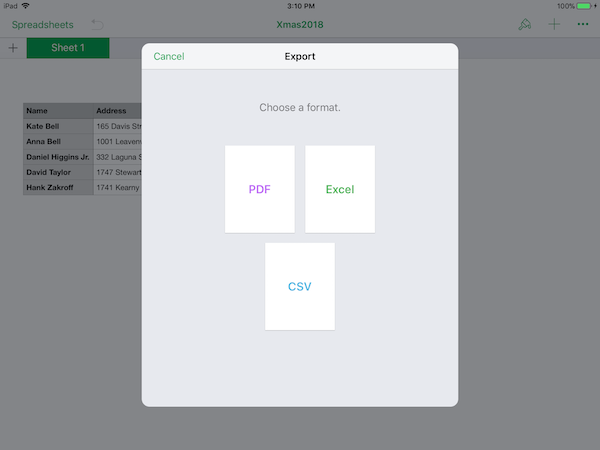
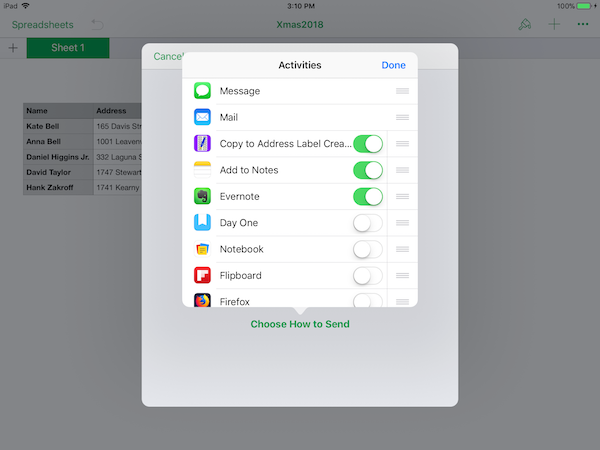
followed by CSV. In the How To Send dialog, swipe the first row to the left until More is displayed; tap it.
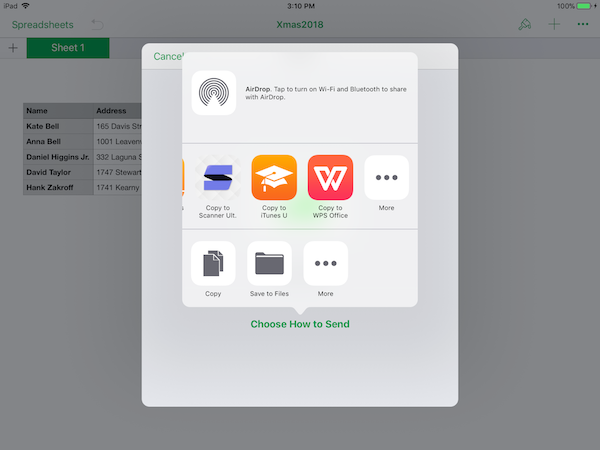
In the Activities dialog, scroll down until you see “Copy to Address Label Creator”; turn it On, move it nearer to the top and tap Done. You only have to do this once.
Scroll the first row back to the left and tap the “Copy to Address Label Creator” icon.
The CSV file will to copied to the app’s Documents, the app launched and positioned at the Addresses step, Import sub-step IF the app is not running; otherwise, to whichever step and sub-step the running app is on. If the latter is Addresses>Import with the popover displayed, close the popover and tap Import again to see the transferred CSV file displayed in the popover.

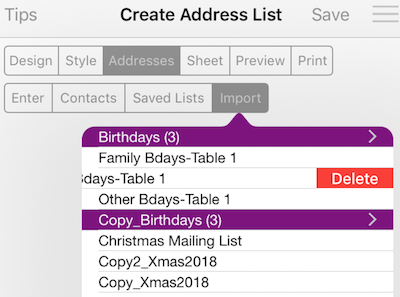
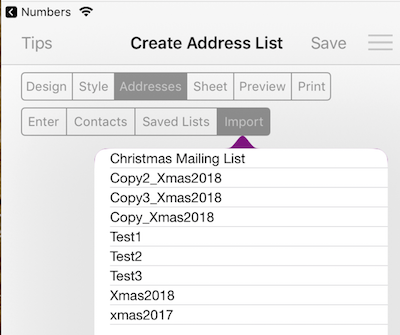
If the exported CSV file already exists in Documents, a copy will be written with the prefix “Copy_” add to the file name. The first copy would be called “Copy_Xmas2018”, the second copy called “Copy2_Xmas2018”, etc. The following screenshot shows Xmas2018 has been exported to the app 4 times.
If the Numbers spreadsheet has multiple sheets, each is exported as a separate CSV file, which are collectively compressed into a ZIP file. The app will unzip the file in a Documents folder. The folder will be displayed in the popover; tap it to expose its content and select the CSV file you want to add to the address list. If the folder already exists in Documents and the ZIP file is exported again, another folder is written with the prefix “Copy” add to the folder name. The same naming convention is used to name copies of folders that is used to name copies of CSV files.
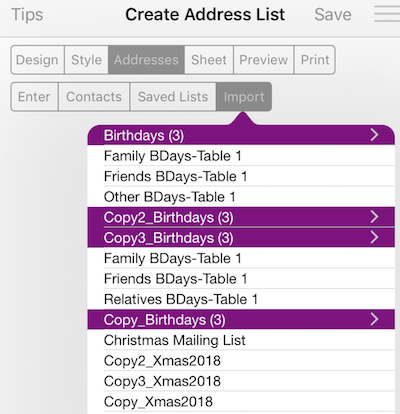
Suppose a Numbers spreadsheet, Birthdays, has 3 sheets – Family BDays, Friends BDays and Other BDays. Furthermore, it has been exported 4 times. Then there will be 4 folders named Birthdays, Copy_Birthdays, Copy2_Birthdays and Copy3_Birthdays, each containing 3 CSV files. The following screenshot shows the 4 Birthdays’ folders, two of which have been expanded to show the CSV files contained therein.
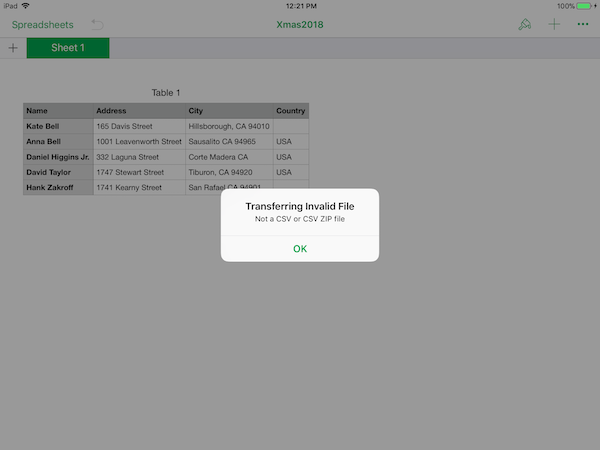
Note: The “Copy to Address Label Creator” icon is only displayed if a CSV file or CSV ZIP file are exported. If you try to export to a PDF file, the icon will not be displayed. However, if you try to export to Excel, the icon is erroneously displayed by iOS. In this case, an error dialog is displayed and nothing is exported; tap OK to dismiss it.
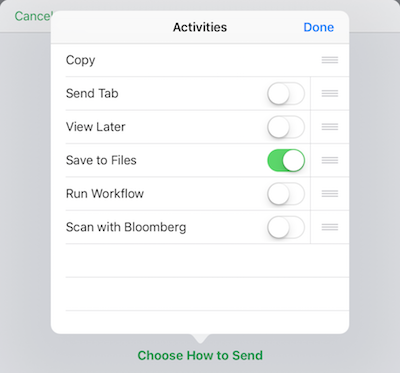
Instead of selecting Copy to Address Label Creator above you can select Save to Files which writes the file being exported from Numbers to the Address Label Creator’s Documents folder on your iPad. To use the Save to Files option, you may have to turn it on if it doesn’t appear in the second row. Scroll to the end of the 2nd row, tap More… and in the Activities dialog turn it on.
When the Save to Files action is tapped, the following dialog is displayed; select On My iPad>Address Label Creator.
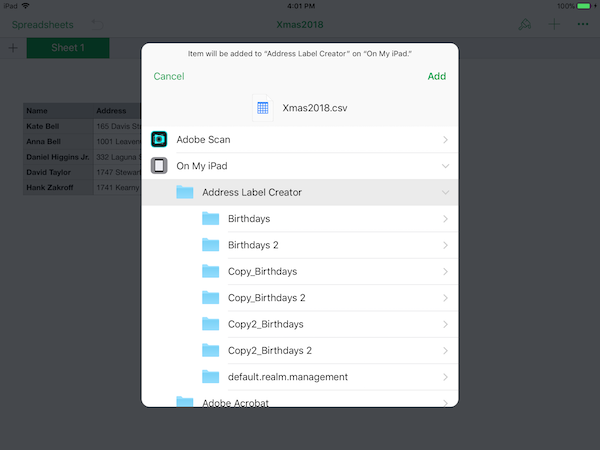
Notice all of the sub-folders in the Documents folder are also displayed. DO NOT select any sub-folder, especially the Realm sub-folder. CSV files and CSV ZIP files in sub-folders will be ignored by Addresses>Import. Simply select Add.
When Addresses>Import is selected, the saved CSV files will appear in the popover list. A saved ZIP file will be unzipped and the ZIP file deleted. If the same named ZIP file is saved again, it will be unzipped into a uniquely named sub-folder following the Copy naming convention described above.
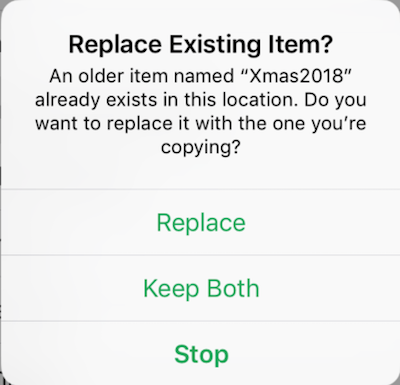
If the exported file to be saved has the same name as one already in the Documents folder, you have the option to overwrite it (Replace option) or make a copy (Keep Both option) or not to save the file (Stop option).
Since you can save non-CSV files, like PDF files and Excel files, it is your responsibility to manage their deletion. You can do this in 2 ways – connect your iPad to iTunes and delete them from the app’s Documents folder or use the Files app (available in iOS 11 and above).
WARNING: Do not delete any Realm file or folder, for this can corrupt the database where all of your designs and address lists are saved. If this happen, you have no alternative but to delete the app from your iPad and install it again. Deleting the app deletes all files in the app’s Documents folder.
6D-3. Import Addresses on iCloud
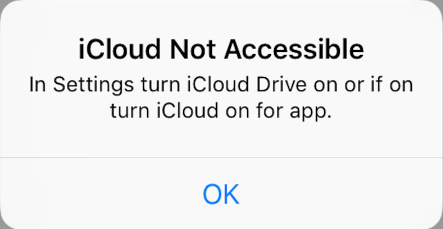
To import a CSV address file on your iCloud Drive, the iCloud Drive toggle switch must be turned on in your Settings and beneath it the Address Label Creator toggle switch must be turned on; otherwise you will get a warning when tapping iCloud.
When you tap iCloud, the iCloud files and folders you can access are displayed in the right panel, which is different for iOS 9 and iOS 10 than for iOS 11. The display for iOS 9 and iOS 10 is

while for iOS 11 it is
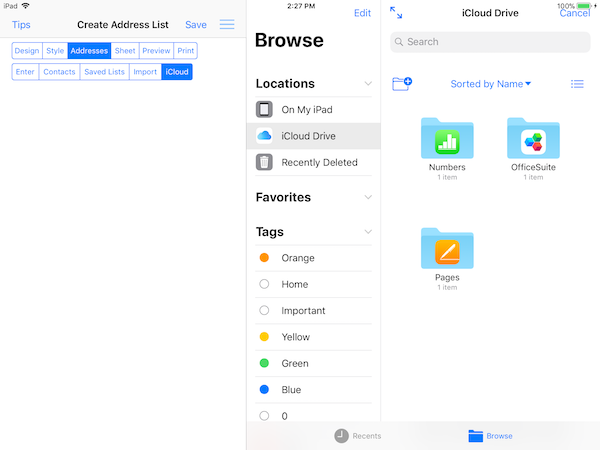
Notice for iOS 11 you can also select a CSV file from other locations, namely the Recents accessed or from those On My iPad.
Only a CSV file can be selected. CSV files are identified by the fact their name is not greyed out and by their thumbnail icon. In the Numbers folder, for example, only Xmas2018 with a grid icon can be selected. The other Xmas2018 is a Numbers file and cannot be selected.
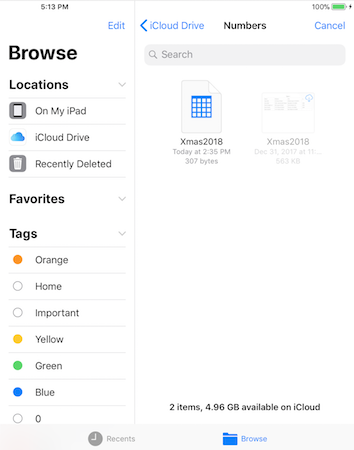
Tap a CSV file and its addresses will be added to the address list.
6E. Manage Address List
In the right panel you can manage the address list – edit and delete an address, print it, export it to a CSV file on the iPad, save it to the iPad and clear the list.
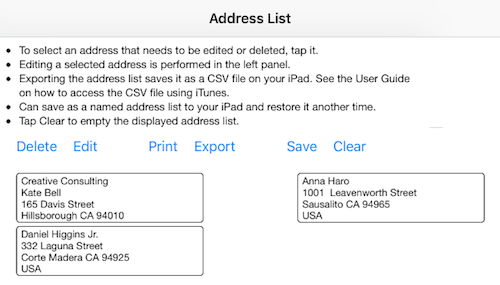
- Delete Address: Tap to select an address that needs to be deleted; it will be outlined in blue. Then tap Delete to remove the address from the list. Use delete to remove duplicate and invalid addresses.
- Edit Address: Tap Edit to edit the selected address. Editing is performed in-place. When finished, dismiss the keyboard. While editing an address, the Delete, Print, and Save buttons are disabled along with the button in the left panel.
Note: If the virtual keyboard is up in the middle of the screen and therefore partially blocking the address to be edited, press and hold on the little keyboard icon and select dock. Editing then works fine. - Print Address List: Select Print to print the list to an AirPrint enabled printer.
- Export Address List: Select Export to export the list to a CSV spreadsheet. Fill in the name of the file in the export dialog:
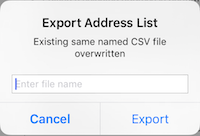
If the address list is successfully exported, the acknowledge message “Exported Address List” will appear on the screen.Use iTunes to obtain the saved CSV file:
- Connect the iPad to your computer. Select your iPad in iTunes.
- Under Summary, select Apps. Scroll the right panel to the bottom.
- Select the Address Label Creator app. Drag your saved address CSV file from the Documents section to some folder or the desktop.
- When finished, select the Done button.
- Save Address List: Select Save to save the address list to the iPad from where it can be restored later. Fill in the name of the list in the save dialog:
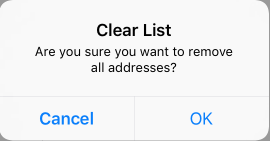
- Clear Address List: Select Clear to remove all addresses from the address list. This also means in the Preview step, the list of addresses along with their repetition counts are removed. Use Clear when you want to start a new design. You must respond to the confirmation dialog, provided in case you change your mind or unintentionally tapped Clear.
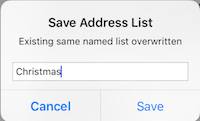
If the address list is successfully saved, the acknowledge message “Address List Saved” will briefly appear on the screen.
The name of the list will appear in parenthesis to the right of the right panel’s title. If the address list is subsequently changed, an asterisk ( * ) will appear after the name as a reminder it has been changed and needs to be saved again.
7. Step 4: Select Unusable Labels
Tap the Sheet step to see the label products available for the label size you selected back in the Design step.

7A. Label Products
The label sheet product’s specifications include label sheet size, label size, label type, labels per sheet, brand, and indicative products you can purchase. The listed products are not all of the products a manufacture has available. For a given label size, a product number indicates the number of sheets supplied in the package. Check your online retailer or local retail store for other products having the same label size, but more/less label sheets.
7B. Unusable Labels
The right panel displays all the labels on a label sheet. Tap on labels missing of the first sheet only. Tap again to revert back to available. Unusable labels are marked with an X.
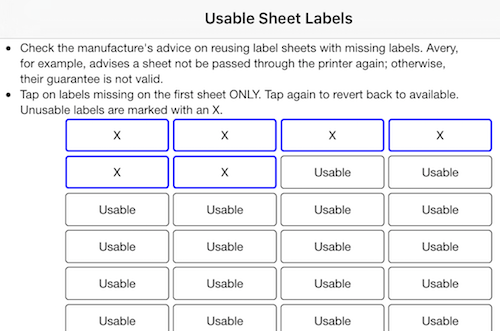
Check the manufacture’s advice on reusing label sheets with missing labels. Avery, for example, advises a sheet not be passed through the printer again; otherwise, their guarantee is not valid.
You may be able to pass the same full sheet through the printer more than once if you want a different design for the same label. Use the label repetition count to control how many labels get filled out, but on subsequent passes mark labels already printed as unusable.
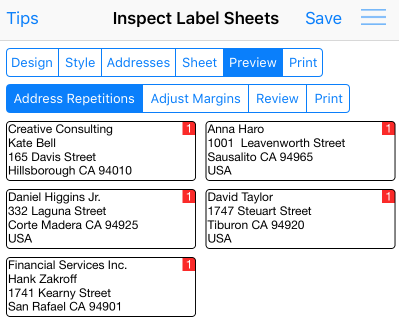
8. Step 5: Preview Label Sheets
Before printing the address list to an actual label sheet, you need to specify how many times each address in the address list is replicated on the label sheet. Tap the Preview step to see all address, which have an initial repetition count of 1. The number in the red badge marker is the number of times the address will be repeated in the label sheets.
You can set each repetition count up to the max number of labels on the label sheet product. There is no limit as to how many label sheets are required. The sum of all repetition counts and the number of labels on the label sheet determines how many label sheets will be printed.
Addresses are laid out on a label sheet row-by-row, left-to-right in the order they appear in the address list.
8A. Specify Repetition Counts
The number of times an address is replicated on the label sheet is controlled by its repetition count. To change the repetition count, tap the address and in the popover, rotate the count picker wheel. Note: You can select zero if you don’t want the label to appear on the label sheets.
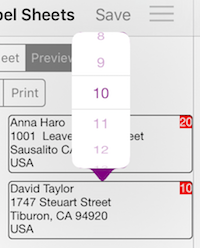
Specify how many times each address is to be replicated on the label sheets. When the repetition counts have been set, select the Review sub-step and review the label sheets. Note: If the address list is modified in any way except by editing an address, all addresses are reloaded and the repetition counts reset to 1.
8B. Adjusting Sheet Margins
When you print label sheets, it is possible the physical label’s content is not perfectly aligned within its boundaries. Misalignment is most notably apparent if the label has a border or is filled with a background color or photo. There are numerous reasons why misalignment can occur:
- The top-bottom label sheet margins should be the same, as should the left-right margins. This is not always the case, depending on the manufacture of the label sheets. For example, one off-brand manufacture’s top margin was 1/32″ larger causing label content to be 1/32″ higher.
- In the iOS print dialog, Print was selected before the pages snapped into place which can take up to 10 seconds or more. The snap is physically apparent when it happens.
- The printer did not feed the label sheet uniformly causing a row of printed labels to be slightly skewed.
The app provides the means to adjust the margins. Before using this feature, you need to decide if any adjustments are needed for your choose label sheet size. First, test print on plain paper a preview of a full label sheet or design a simple label with a thin colored border, say red, around it and print it. The preview has dotted lines around the label boundary. Then using a ruler accurate to 1/32″ or 1mm, measure the top and left margins. Then measure the top and left margins of the label sheet. The 2 top margins should be the same as should the 2 left margins. If either differs, you need to make margin adjustments to the top-bottom and/or left-right margins. After making the adjustments, do another test print and make the measurements again to verify the margins are the same. When the margins match within an acceptable tolerance, you are ready to print on the label sheet.
The range of adjustment values is -1/4″ to 1/4″ in steps of 1/64″ for letter sheets and -5mm to 5mm in steps of 0.5mm for A4 sheets.
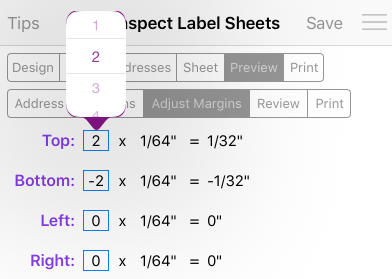
Adjustments are expressed as a multiplier of the step value. Whatever multiplier value you use for the top margin, first try using the negative value as the multiplier of the bottom margin. Likewise for the left and right margins. If the top-bottom or left-right multipliers are different, the label layout may or may not be correct. For example, suppose the layout for the label sheet is 4×15 – 4 columns and 15 rows. Unequal multipliers may result in an incorrect 3×20 layout.
Note: When placing the label sheet in the printer tray, make sure you feed the edge you decided was the top.
8C. Review Label Sheets
Before printing the label sheets, review the label sheets in the right panel for accuracy. Make sure each label’s content is as intended, e.g., there are no line wraps because the length of the longest line in an address won’t fit in its address textbox. Note: The font size is adjusted so all address lines fit in its textbox.
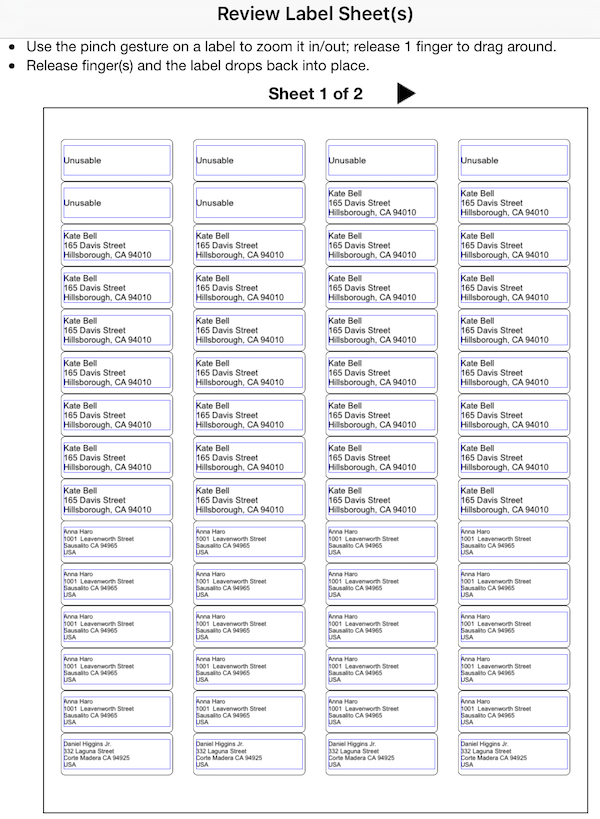
If a line wraps, change the size of the address box in the label template. Either reduce its height thereby reducing the print font size or widen it.
Use the pinch gesture on a label to zoom it in/out; release 1 finger to drag it around. Release finger(s) and the label drops back into place.
8D. Print Preview Label Sheets
Before printing the label sheets, print the review label sheets. Each label will be outlined. Overlay the print out on a label sheet to check label content lines up correctly.
Use the outward pinch gesture to zoom out pages to be printed and the inward pinch gesture to zoom back in. Note: This will not work on older iPad models.
Expect a delay before the print dialog appears. The older the iPad and the greater the number of label sheets, the longer the delay. While the label sheets are being prepared, a purple spinning activity indicator is displayed in the middle of the screen with the text “Preparing printout” to its right.
Warning: Before pressing Print in the print dialog, wait for the page images to snap into place, i.e., fill out the page; otherwise, the print out will be the wrong size and label content misaligned. This can take upwards of 10 seconds or more. Watch for the page content to snap into place, for it is very noticeable.
Warning: Printers have hardware margins that cannot be printed into. For label sheets that have no side and/or top-bottom margins, address objects need to be moved inward/downward sufficiently to be outside the hardware margins; otherwise, the initial portion of addresses in the first row and/or column will be cut off. This is also the case when the label sheet’s left margin < left hardware margin and the label sheet’s top margin < top hardware margin. An alternate procedure is to save the label sheets as a PDF and use borderless printing. See below.
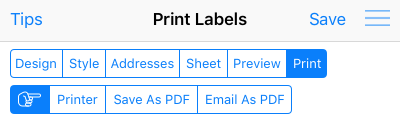
9. Step 6: Print Label Sheets
When you are ready to print the label sheets, tap the Print step. You can print the label sheets to an AirPrint enabled printer, save them to a PDF file or e-mail the PDF as an attachment to multiple persons selected from the contact list. The PDF can be printed later.
Warning: Before pressing Print in the print dialog, wait for the page images to snap into place, i.e., fill out the page; otherwise, the print out will be the wrong size and label content misaligned. This can take upwards of 10 seconds or more. Watch for the page content to snap into place, for it is very noticeable.
9A. Printing
Select the Printer sub-step to send the label sheets to an AirPrint enabled printer. Note: Expect a delay before the print screen is displayed. The older the iPad and the greater the number of labels, the longer the delay.
Make sure your printer’s default page size (A4 or Letter) is set correctly.
Make sure you feed the top of the label sheet into the printer. A label sheet may be marked as to which end to feed first. If the top is not marked, measure the top and bottom margins and feed the one that is the largest. There may be a slight difference, e.g., of 1/32″ or 1mm between the top and bottom margins. In some label products, the top and bottom margins may be the same.
Use the outward pinch gesture to zoom out pages to be printed and the inward pinch gesture to zoom back in. Note: This will not work on older iPad models.
While the label sheets are being prepared, a purple spinning activity indicator is displayed in the middle of the screen with the text “Preparing printout” to its right.
Warning: Printers have hardware margins that cannot be printed into. For label sheets that have no side and/or top-bottom margins, address objects need to be moved inward/downward sufficiently to be outside the hardware margins; otherwise, the initial portion of addresses in the first row and/or column will be cut off. This is also the case when the label sheet’s left margin < left hardware margin and the label sheet’s top margin < top hardware margin. An alternate procedure is to save the label sheets as a PDF and use borderless printing. See below.
You can go back to a previous step and change anything before executing this final step.
9B. Save as PDF
Instead of printing the label sheets, they can be saved to a PDF file in the app’s Documents on your iPad. The PDF file can be used to print the label sheets at a later time. Tap the Save As PDF sub-step and in the save dialog enter the name of the PDF file. When finished tap the Done key on the keyboard.
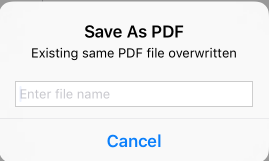
If the print label sheets are successfully saved to a PDF file, the acknowledge message “Saved Print PDF” will appear briefly on the screen.
Expect a delay before the acknowledge message appears. The older the iPad and the greater the number of label sheets, the longer the delay.While the PDF is being prepared, a purple spinning activity indicator is displayed in the middle of the screen tagged with “Preparing PDF to Save”.
The saved PDF file can be accessed using iTunes:
- Connect the iPad to your computer. Select the iPad in iTunes.
- Under Summary, select Apps. Scroll the right panel to the bottom.
- Select the Address Label Creator app. Drag the PDF file in the Documents section onto the desktop or a folder.
- Select Done when finished.
When you print the PDF file, it is best to use the Adobe Reader app, but you can also use the Firefox browser or the Opera browser. Here are some instructions for these apps on how to best print the PDF onto label sheets:
- Adobe Reader: In the Print dialog under Page Sizing & Handling, Size tab, make sure the “Actual size” option is selected.
- Firefox Browser: In the Print dialog, the Options “Ignore Scaling and Shrink To Fit page Width” should be checked.
- Opera Browser: In the Print dialog, make sure the “Paper size” is set correctly (US Letter or A4) and the Options “Fit to page” is selected.
- macOS Preview: In the Print dialog, make sure the “Scale” option is selected and set to 100%. Also, make sure the “Paper Size” is set correctly (US Letter or A4).
9C. Email as PDF
Instead of printing the label sheets, they can be e-mailed as a PDF file to multiple recipients selected from the contacts list. The PDF file can be used to print the label sheets at a later time. Tap the Email As PDF sub-step and in the displayed dialog enter the name of the PDF file. When finished tap the Done key on the keyboard.
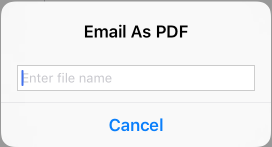
Expect a delay before the e-mail message appears. The older the iPad and the greater the number of label sheets, the longer the delay. While the PDF is being prepared, a purple spinning activity indicator is displayed in the middle of the screen tagged with “Preparing PDF to Email”.
When the e-mail message is displayed, tap the To: input field and select 1 or more recipients from the contacts list. When finished tap Send.
See here for the best way to print the PDF onto label sheets.
9D. Borderless Printing
It is necessary to resort to borderless printing if the label sheet has no margins or the sheet’s margins are narrower than the printers hardware margins. To perform borderless printing you need the label sheets as a PDF. Either select Save As PDF in the Print step or select Email As PDF. The saved PDF file can be accessed using iTunes. See here for instructions.
Borderless printing was tested on the following apps with mixed results, which are summarized below. The only accurate one was macOS Sierra’s Preview. If you have apps that can print a PDF, experiment first by printing on paper. Put a border around the label so you can tell what gets cut off, if anything, along the sheet’s edges.
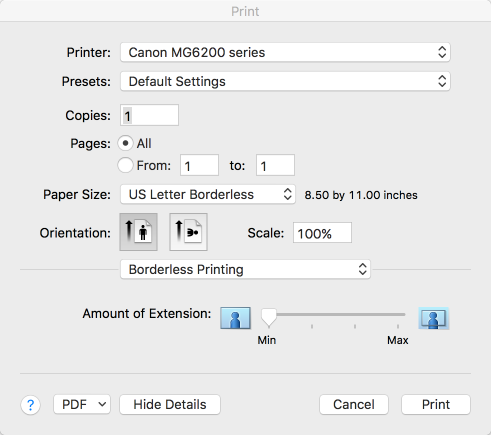
- macOS Preview: (most accurate procedure)
- Open the saved PDF file with Preview
- Initiate printing by typing ⌘P
- In the Print dialog, change the Paper Size to A4 Borderless or US Letter Borderless, Scale to 100%, and underneath Orientation, selected Borderless Printing, which will display the option Amount of Extension – set it to Min.
- Select Print
- Safari Browser: The printed results are slightly shifted left, but vertically the labels are aligned. If you use Safari to perform borderless printing, you will have to correct the shift by adjusting the sheets margins. See here for instructions.
- Firefox Browser: The printed results have hardware margins with cuts off portions of the labels.
- Opera Browser: The print dialog does not have a borderless Paper Size option.
- Adobe Reader: Borderless printing can be set up by selecting Page Setup and in that dialog selecting Manage Custom Sizes…, where you can add a new option using + and setting all of the margins to zero. However, the printed results are slightly more shifted left than Safari’s results. Also, the labels are badly aligned vertically with those on the label sheet, mainly because the top and bottom row’s labels are the wrong sizes due to being cut off.
10. Frequently Asked Questions (FAQs)
- How can I make a copy of a label design? Answer
- When I print the preview labels or label sheets they are out of alignment with the physical labels. Why? Answer
- How can I add an image to Photos on my iPad so I can use it in a label? Answer
- How do I convert an Excel spreadsheet of addresses to a CSV file? Answer
- How do I add a CSV file of addresses to my iPad so it can be accessed by the app? Answer
- How do I access the saved PDF file on my iPad so I can print the. label sheets later? Answer
- How best to print the PDF file? Answer
- Some text in the left/right column and/or top/bottom row of the label sheet is cut off. Why and how can I correct this? Answer
- I don’t have an AirPrint Wi-Fi printer. How can I print the label sheets? Answer
- If I save session state and later delete a photo used in the saved label design, will the restored design contain the photo? Answer
- What are the Realm files in the app’s Documents on iTunes? Answer
- Can I use Siri to enter an address? Answer
- I find it difficult to select the line in the shipping template by tapping it. Is there another way? Answer
- I just bought a new iPad. How do I put all of my saved designs and address lists on it? Answer
- How can I set the Sender’s address in a shipping label to a contact? Answer
- How can I find the hexadecimal value of a color, e.g., pastels? Answer
Answers:
1. How can I make a copy of a label design?
First save the original label design giving it a unique name. If the design is already saved, restore it. Then save the design giving it a different unique name. The second saved design is a precise copy you can then modify.
2. When I print the preview labels or label sheets they are out of alignment with the physical labels. Why?
The most common reason is you did not wait for the print dialog to snap the pages into place before selecting Print. This can take upwards of 10 seconds or more. You will see the snap happen. This behavior is due to iOS, not the app.
Another reason is you need to adjust the label sheet margins. On why this can happen and how you can determine the adjust values, see the section Adjusting Sheet Margins.
3. How can I add an image to Photos on my iPad so I can use it in a label?
The image must be in JPG format and its size < 16MB. Mail the image to yourself. In Mail on your iPad, hard press the image and in the popup dialog, select the Save Image option. The image will be saved to Photos.
Alternatively, place all of the photos you want to add toPhotos in a folder under Pictures on your computer and use iTunes to transfer them to the iPad:
- Connect the iPad to your computer. Select the iPad in iTunes
- Under Summary, select Photos
- Check “Sync Photos”
- Select the folder where you saved you photos in “Copy Photos from:”
- The “All Folders” button should be selected
- Click on the Sync button
- When the sync is finished, select the Done button
4. How do I convert an Excel spreadsheet of addresses to a CSV file?
Use the Numbers app to open the Excel file. Delete all blank rows and columns. In the File menu, select the Export To CSV… option. Follow the instructions in the popup dialog. If the spreadsheet has rows above the row with the column headers, they need to be deleted, for the first row must be the column headers. A CSV file is a text file. Edit it with a text editor, e.g., the TextEdit app.
5. How do I add a CSV file of addresses to my iPad so it can be accessed by the app?
See the explanation here.
6. How do I access the saved PDF file on my iPad so I can print the label sheets later?
See how here.
7. How best to print the PDF file?
See the various ways here.
8. Some text in the left/right column and/or top/bottom row of the label sheet is cut off. Why and how can I correct this?
Printers have hardware margins that cannot be printed into. For label sheets that have no side and/or top-bottom margins, address objects need to be moved inward/downward sufficiently to be outside the hardware margins. This is also the case when the label sheet’s left margin < left hardware margin and the label sheet’s top margin < top hardware margin. An alternate procedure is to save the label sheets as a PDF or e-mail the PDF, and use borderless printing. See here.
9. I don’t have an AirPrint Wi-Fi printer. How can I print the label sheets?
In the Print step, select the Save As PDF and enter the name of the PDF file in the popup dialog. See FAQ 6 and 7 for how to access the saved PDF file and best print it, respectively.
OR In the Print step, select ‘Email As PDF’ to send it as an attachment to yourself. See FAQ 7 on how to best print it.
10. If I save session state and later delete a photo used in the saved label design, will the restored design contain the photo?
Yes. The photo is saved as part of the session state. When a saved design is restored, it is identical to what it was just before it was saved. To be saved, the photo must be < 16MB.
11. What are the Realm files in the app’s Documents on iTunes?
The Realm files are the database where saved address lists and designs are stored. If you choose to delete these files, everything you have saved will be lost.
12. Can I use Siri to enter an address?
Yes. See how here.
13. I find it difficult to select the line in the shipping template by tapping it. Is there another way?
Select the Style step, then the Line sub-step. The line in the label template will be selected. You may find it easier to position the line by first moving other label objects out of the way or resizing them. Afterwards, reposition the moved objects or resize them.
14. I just bought a new iPad. How do I put all of my saved designs and address lists on it?
First, install the same version of the app on your new iPad. Then copy the Realm database files on your old iPad to the new iPad as follows:
- Connect the old iPad to your computer. Select the iPad in iTunes.
- Under Summary, select Apps. Scroll the right panel to the bottom.
- Select the Address Label Creator app. Drag all Realm files in the Documents section onto the desktop or a folder.
- Select Done.
- Disconnect the old iPad and connect the new iPad to your computer. Select the iPad in iTunes.
- Under Summary, select Apps. Scroll the right panel to the bottom.
- Select the Address Label Creator app. Drag all of the Realm files you just retrieved from your old iPad onto the Documents section.
- Select Done.
When you run the app on your new iPad, you can now restore saved designs and address lists.
15. How can I set the Sender’s address in a shipping label to a contact?
For how see here.
16. How can I find the hexadecimal value of a color, e.g., pastels?
Here are a few good resources:
- Use your favorite browser’s search engine and search on “html colors”
- For true color charts, go to theodora.com/html_colors.html
- For pastels go to hitmill.com/html/pastels.html and
tainyan.com/references/entry-2/pastel-colors-chart.html - To get the hex for a real world color, check out the Cone app.