Table of Contents
1. Introduction
Many times in a business you need to send a message to your clients, employees, staff, team or sales force. Now you can prepare them ahead of time and schedule a time for them to be sent. When the send time approaches or arrives, you can be notified to send them. You can postpone sending them and schedule a time to be notified later. When the message is sent, another one can be scheduled based on a specified repeat frequency. Repetitive send events are great for meetings that occur on a periodic basis, like a weekly staff meeting, a monthly sales meeting a quarterly review, or annual review of client medicare insurance coverage.
You can also schedule personal events, e.g., sending a birthday greeting to a friend, sibling, parents or relative, reminding yourself to change the A/C filter every 6 months or to remind you of your spouse’s birthday or your parent’s anniversary a few days ahead of time.
Messaging Notifier is a great way to remind yourself to send a message whose text and recipients are already set up. And the message and recipients can be reused in new events. They also can be edited, e.g., add to or delete from a recipient list or change the text of a message.
Note: The app does not send messages automatically. Apple forbids an app from automatically sending a message from an iOS device for security reasons. Auto-sending requires sending the message from a server and using push notifications to inform the user. This service is not free.
2. Overview
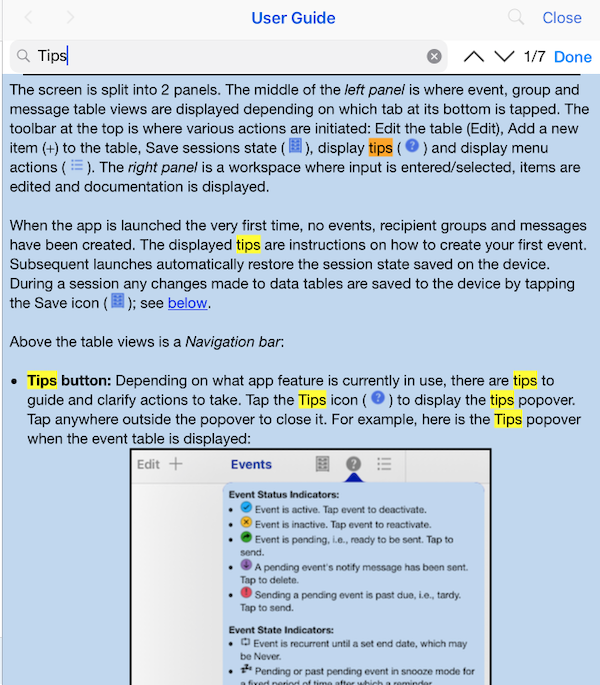
When the app is launched the very first time, no events, recipient groups and messages have been created. The displayed tips are instructions on how to create your first event. Subsequent launches automatically restore the session state saved on the device. During a session any changes made to data tables are saved to the device by tapping the Save icon (  ); see below.
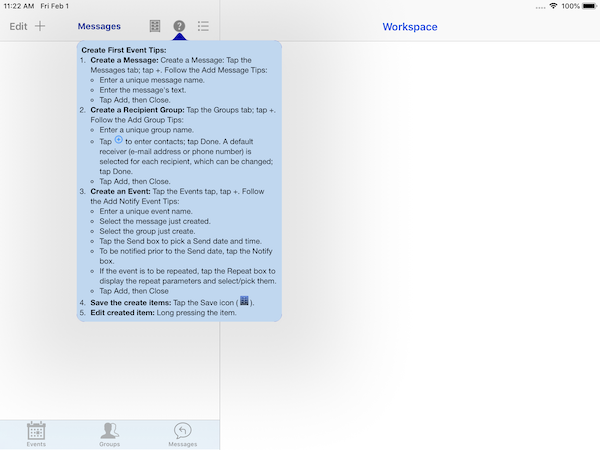
The screen is split into 2 panels. The middle of the left panel is where event, group and message table views are displayed depending on which tab at its bottom is tapped. The toolbar at the top is where various actions are initiated: Edit the table (Edit), Add a new item (+) to the table, Save sessions state (
), display tips (  ) and display menu actions (
  ). The right panel is a workspace where input is entered/selected, items are edited and documentation is displayed.
- Tips button: Depending on what app feature is currently in use, there are tips to guide and clarify actions to take. Tap the Tips icon ( ) to display the tips popover. Tap anywhere outside the popover to close it. For example, here are the Tips popover when the event table is displayed:
- Title: The center of the navigation bar is a description of the content displayed below.
- Save button: Tap the Save icon ( ) at any time to save session state to your device: events, groups and messages, preferences, sent history and deleted items. They will be automatically restored in another session. The Save icon turns black when any changes have been made to table items. This serves as a reminder changes were made that should be saved; otherwise, they will be lost if the app is shut down.
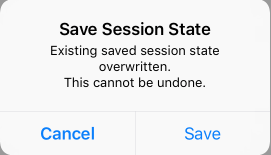
If the item changes are successfully saved, the Save icon turns back to navy blue.WARNING: If you delete the app, all data associated with it is deleted, namely, your saved events, groups and messages, preferences, sent history and deleted items.
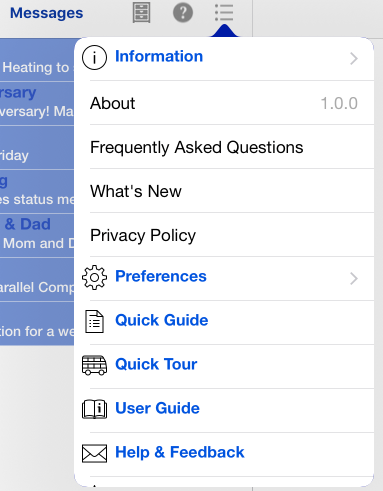
- Menu button: Tap the menu icon ( ) to display the menu popover from which you can access the Quick Guide and User Guide, take a quick tour of the app, send e-mail feedback to the developer, rate the app in the App Store or set preferences, for example.
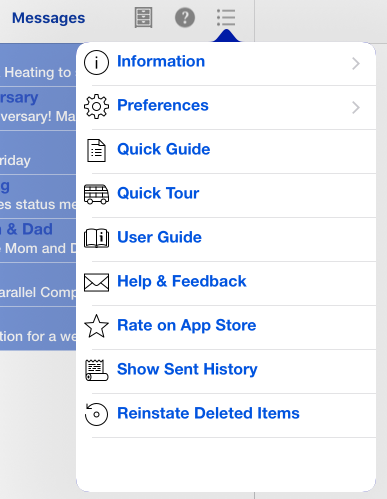
See the section History of Sent Events for details on sent events when you tap Show Event History. See the section Reinstate Deleted Items for details on reinstating deleted events, groups and/or messages when you tap Reinstate Deleted Items.
Tap Information to expand it. From there you can learn About the app, display the Frequently Asked Questions and explore their answers, learn What’s New in every released version of the app and display the Privacy Policy.
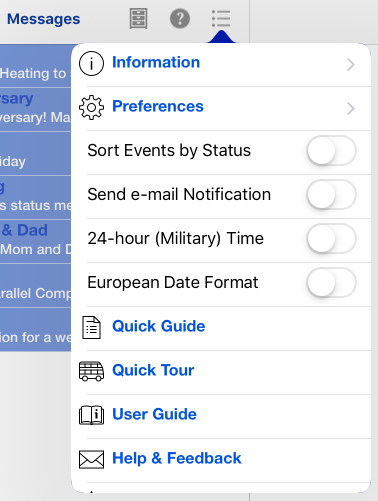
Tap Preferences to expand it. There you can turn on/off the how the events table is sorted, send an e-mail notification and control how time and dates are displayed. The default settings are off. By default, events are sorted by send time. The settings are restored the next time the app is launched. See the section Preferences for details.
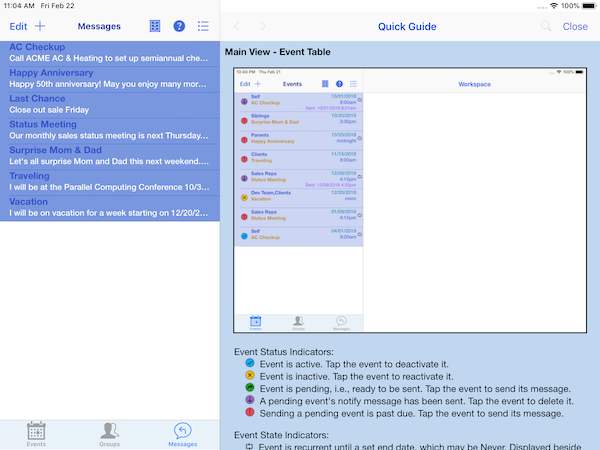
Tap Quick Guide to display the Quick Guide and quickly learn about the app’s features and how to use them.
Tap Quick Tour to see all of the app’s features briefly explained. To navigate between pages, swipe left or right. To advance a page, tap Next. Tap Done when finished.

Tap User Guide to display the User Guide, which contains a Table-of-Content. Tap the search icon (to the left of Close) and the search view will be displayed. Tap the search bar and enter the keyword or phrase search criteria. Use the Next and Previous arrows to move to the next/previous occurrence. Occurrences of the keyword or phrase are highlighted in yellow. The current occurrence is highlighted in orange. Tap the up and down carets to see the previous/next occurrence. Tap Done when finished searching.
3. App Features
- Create and schedule message events composed from pre-created messages and recipient groups.
- Multiple ways to be notified when it is time to send an event message: alert notification in the notification center, app badge count, play a sound and/or send an e-mail.
- Send an event message using on-device Messages, the only messaging platform currently supported. No paid credits required.
- Add, edit and delete an event, recipient group and message.
- Ability to change the name of an event, recipient group or message.
- A deleted event, recipient group or message can be restored or permanently deleted.
- Maintains a history of sent messages, which can be deleted individually or as a whole.
- Events can be repeated indefinitely or until a future date.
- Another reminder notification can be repeatedly scheduled for pending and past pending events.
- Preferences to specify how events are to be sorted and specify time and date display formats.
- Session state can be saved to the device at any time and automatically restored in another session.
- Quick Guide and User Guide documents on how to use the app and its features. User Guide includes a section of Frequently Asked Questions (FAQs) and can be searched for keywords and phrases.
- Quick Tour of the app, available on demand, that briefly explains its features.
- Ability to rate the app in the App Store.
- Ability to send e-mail to the developer to report issues, make improvement suggestions or ask questions.
4. Add/Edit a Message
To add a new message, first tap the Messages tab, then the + next to Edit in the upper left corner of the left panel. The Add Message dialog is displayed in the workspace:
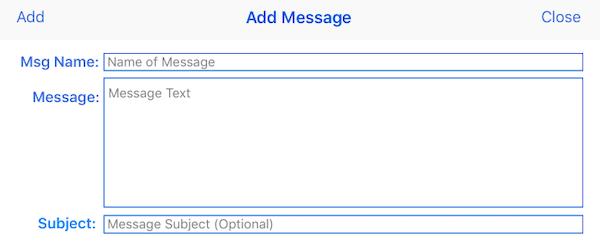
- Tap the Msg Name field and type in a unique name. Two messages cannot have the same name. The check is case sensitive and includes deleted messages. Thus, “Status Meeting” and “status meeting” are different message names.
- Tap the Message field and type in the message.
- If in Settings the Messages option Show Subject Field is on, tap the Subject field and type in the optional message’s subject.
- When finished, tap Add and the new message will appear in the Messages table. All fields are then cleared so another message can be added.
- When finished adding new messages, tap Close to close the dialog.
To edit an existing message in the Messages table, long press the message and the Edit Message dialog is displayed in the workspace. The same input fields as for adding a message are displayed, except they are populated with the message’s values. Any field can be changed. Tap Apply when finished making changes, tap Cancel to not make changes or discard any changes made. Tapping Apply or Cancel closes the dialog.
5. Add/Edit a Recipient Group
To add a new recipient group, first tap the Groups tab, then the + next to Edit in the upper left corner of the left panel. The Add Group dialog is displayed in the workspace:
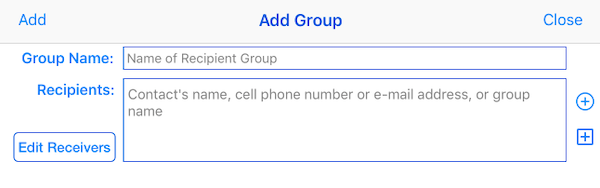
- Tap the Group Name field and type in a unique name. Two groups cannot have the same name. The check is case sensitive and includes deleted groups. Thus, “Sales Reps” and “Sales reps” are different group names.
- Tap the Recipients field and type in the e-mail address or phone number of the recipient. When typing in a phone number, make sure it is in the country’s format.Instead you can select 1 or more recipient from you contacts or select an existing recipient group
- Tap
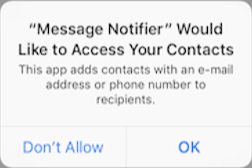
 to select a recipient from your contacts. The first time a dialog will be displayed asking you for access permission; tap OK.
The contacts dialog will be displayed. Tap each contact you want to be a recipient. The contacts will appear in the Recipients in the order they are selected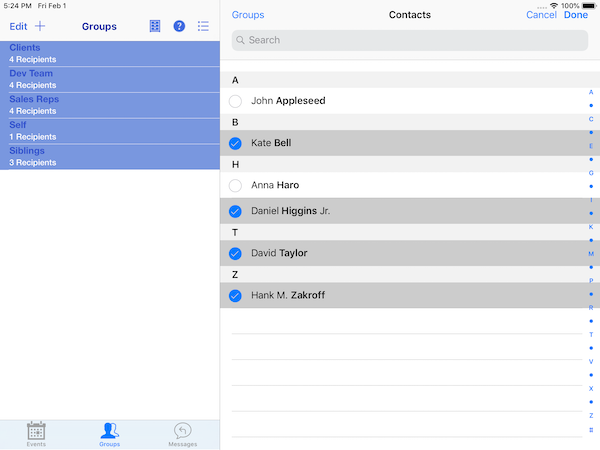
When finished, tap Done. All of the selected contacts will be displayed in the Recipients field and their receivers (e-mail addresses and phone numbers) to which a message can be sent will be displayed.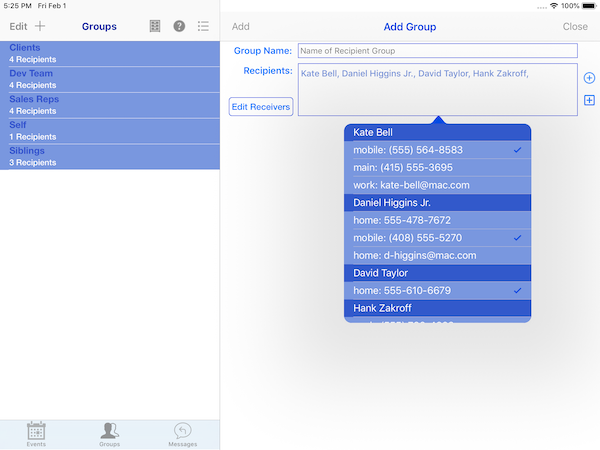
A default receiver for each contact is checked. This can be changed by tapping a different receiver. When finished, dismiss the popover by tapping outside it. You can always change receivers by tapping the Edit Receivers button.The receivers are immutable, i.e., the app doesn’t know that a contact’s contact information is later changed. You would have to edit the Recipients, delete the contact and add them again.
- Tap the
 to select a recipient group from the existing recipient groups. You cannot type in a group’s name.
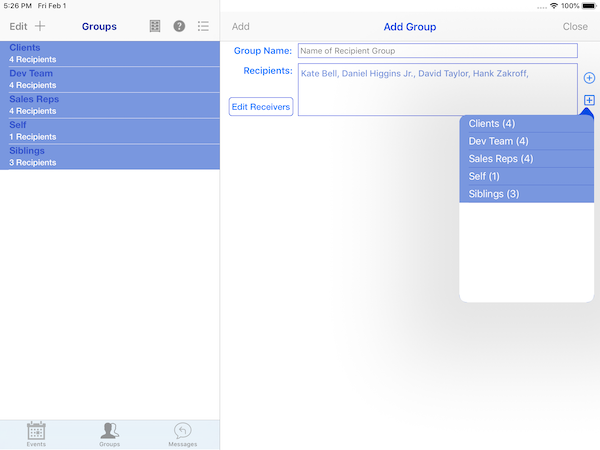
Tap each group you want added; only 1 group can be added at a time.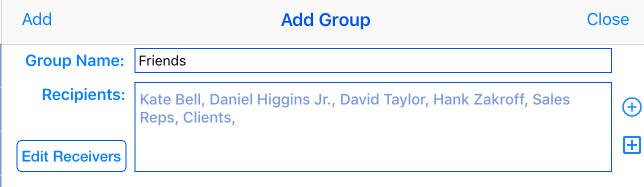
- You can add more contacts or recipient groups to the list by tapping the or again.
- If you change your mind and want to delete a contact or group from the list, first tap the Recipients box, then tap the contact/group and it will be highlighted, i.e., pin markers will appear on either side. These pin markers can be moved left or right to include the adjacent recipient; the pin marker must be moved past the half way point of the adjacent recipient to include them.
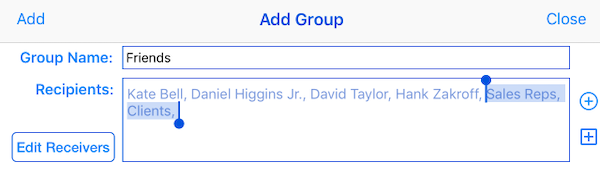
Tap the delete key on the keyboard and the selected recipient(s) will be deleted. - When finished, tap Add and the new recipient group will appear in the Groups table. All fields are then cleared so another group can be added.
- When finished adding new groups, tap Close to close the dialog.
To edit an existing group in the Groups table, long press the recipient group and the Edit Group dialog is displayed in the workspace. The same input fields as for adding a group are displayed, except they are populated with the group’s values. Any field can be changed. Tap Apply when finished making changes, tap Cancel to not make changes or discard any changes made. Tapping Apply or Cancel closes the dialog.
6. Add/Edit an Event
To add a new event, first tap the Events tab, then the + next to Edit in the upper left corner of the left panel. The Add Event dialog is displayed in the workspace:
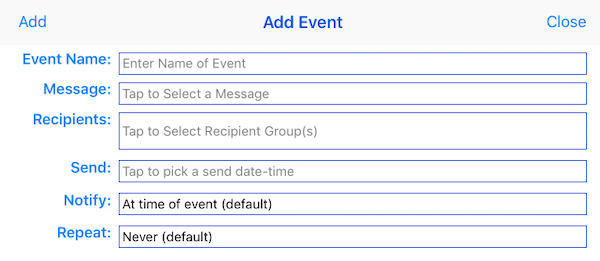
- Tap the Event Name field and type in a unique name. Two events cannot have the same name. The check is case sensitive and includes deleted events. Thus, “On the Road” and “On the road” are different event names.
- Tap the Message field to select an existing message.
- Tap the Recipients field to select an existing recipient group. Group recipients are added 1 at a time. Tap the field again to add another existing group.
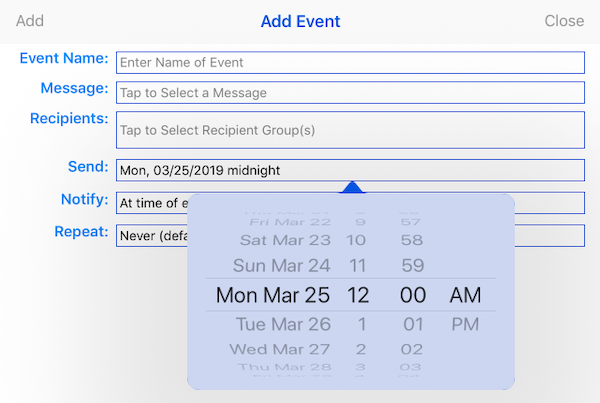
- Tap the Send field to pick a send date-time. The send date cannot be in the past.
- Tap the Notify field to select a notify time prior to the send date. The default is “At time of event”.

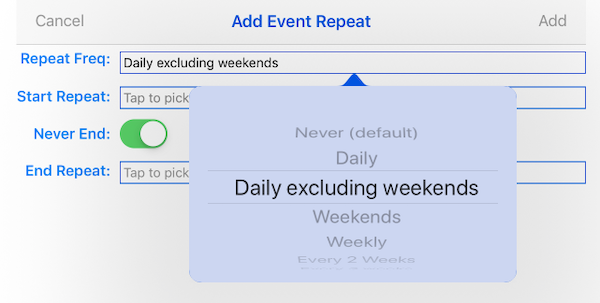
- If the event is to be repeated, tap the Repeat field; the default is Never. The Add Event Repeat dialog is displayed.

- Tap the Repeat Freq field to select the repeat frequency.
- Tap the Start Repeat field to pick when the repeat is to start. The repeat start date cannot be in the past.
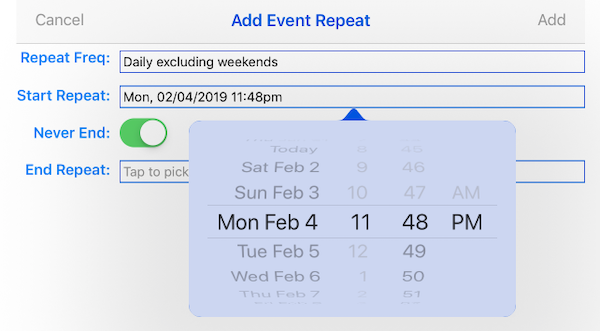
- If the event is to end on a specific date and time, turn the Never End switch off and tap the End Repeat field. Pick a repeat end date-time, which must be after the repeat start date.
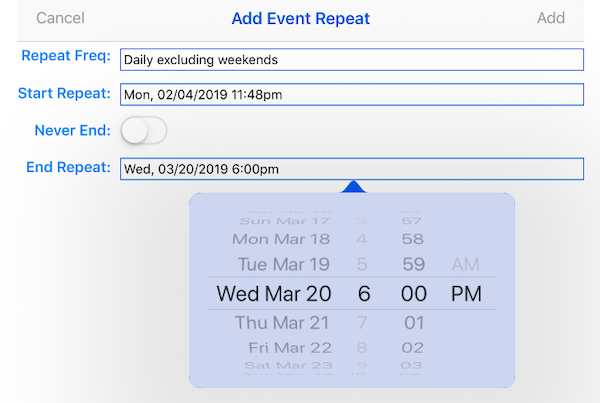
- When finished tap Add.
- To ignore any selections made, tap Cancel.
- Tap the Repeat Freq field to select the repeat frequency.
- When finished, tap Add and the new event will appear in the Events table. All fields are then cleared so another Event can be added.
- When finished adding new events, tap Close to close the dialog.
To edit an existing event in the Events table, long press the event and the Edit Event dialog is displayed in the workspace. The same input fields as for adding an event are displayed, except they are populated with the event’s values. Any field can be changed. Tap Apply when finished making changes, tap Cancel to not make changes or discard any changes made. Tapping Apply or Cancel closes the dialog.
7. Edit Event, Group, Message Table
Tap the tab of the table you want to edit – Events, Groups or Messages. Tap the Edit button to manage the selected table.
- Edit Events table:
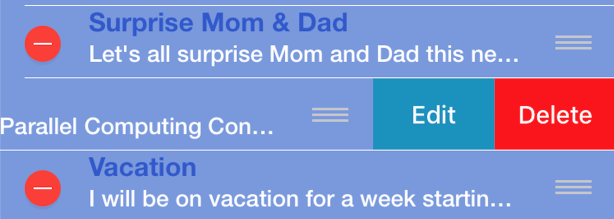
Tap an event’s and options are displayed depending on the status of the event: Send, Edit, Remind and/or Delete. Tap the option to invoke it, tap anywhere else within the event to retract the options.
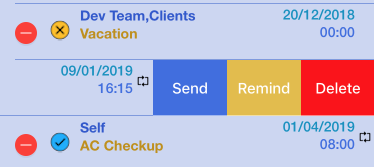
Note: An alternate way to display an event’s options is to simply swipe it left until you see them. If you swipe left far enough only Delete will be displayed. Be careful for if you continue to swipe left the event will be deleted.- Delete: Any event can be deleted regardless of its status. When tapped, the event is removed from the table. It can later be reinstated or permanently deleted. See the section Reinstate Deleted Items for details.
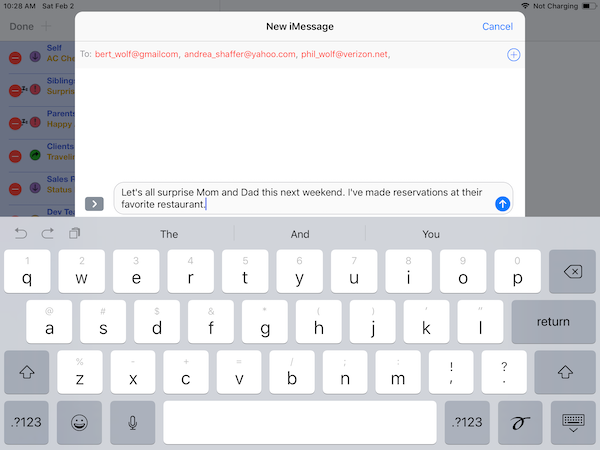
- Send: Only an active, pending or past pending event can be sent. When tapped, Messages is invoked. The To: field is populated with the recipient group expanded to the recipients receivers and the event’s message. You can then choose to Cancel sending the message, send the message as is or edit the To: field, Subject field and/or message before sending.
- Edit: Only an active or inactive event can be edited. When tapped the Edit Event dialog is displayed. See the section Add/Edit an Event for details.
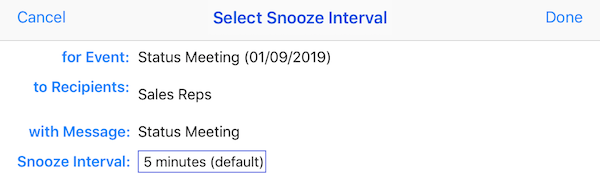
- Remind: Only a pending or past pending event can be put in snooze mode, i.e., another notification scheduled to remind you the event needs to be sent. This can be done repeatedly. When tapped the Select Snooze Interval is displayed. See the section Snooze Mode for details.
If the sent event is a repeat event, another event is created with a send date-time based on the event’s repeat frequency.
If the status of the sent event is active, its scheduled notification is cancelled.
Note: You can also send a pending or past pending event simply by tapping it.
Note: If you try to send a message and some recipients (phone numbers or e-mail addresses) are not registered with Messages, iOS prevents the message from being sent until they are corrected or removed. This behavior is different on a iPhone where iOS permits the message to be sent, but later sends a message stating it couldn’t be sent. When you tap the To: field, Invalid recipients are displayed in red, valid recipients in blue.
- Edit Groups table:
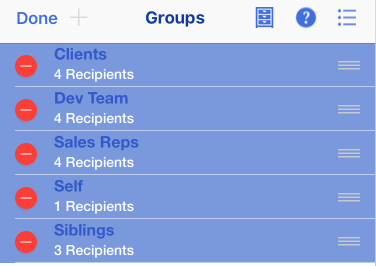
Tap a group’s and 2 options are displayed: Edit and Delete. Tap the option to invoke it, tap anywhere else within the event to retract the options.
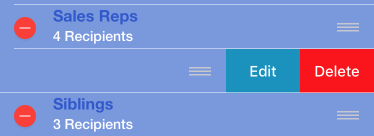
Note: An alternate way to display the group’s options is to simply swipe it left until you see them. Be careful for if you continue to swipe left the group will be deleted.
- Edit: When tapped the Edit Group dialog is displayed. See the section Add/Edit a Group for details.
- Delete: When tapped, the group is removed from the table. It can later be reinstated or permanently deleted. See the section Reinstate Deleted Items for details. A group cannot be removed if it is being used by at least 1 non-sent event or another group’s recipients. An attempt to do so will display a warning dialog.
- Edit Messages table:
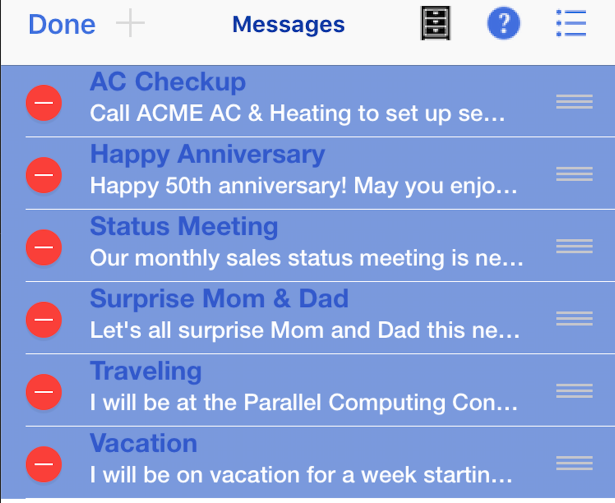
Tap a group’s and 2 options are displayed: Edit and Delete. Tap the option to invoke it, tap anywhere else within the event to retract the options.
Note: An alternate way to display the Message’s options is to simply swipe it left until you see them. Be careful for if you continue to swipe left the message will be deleted.
- Edit: When tapped the Edit Message dialog is displayed. See the section Add/Edit a Message for details.
- Delete: When tapped, the message is removed from the table. It can later be reinstated or permanently deleted. See the section Reinstate Deleted Items for details. A message cannot be removed if it is being used by a least 1 non-sent event. An attempt to do so will display a warning dialog.
A sent event can be deleted by tapping it. It is sent to the sent history list. See the section History of Sent Events for details on how to permanently delete sent events from the history list.
An active event can be deactivate by tapping its active status indicator. Tapping it again returns it to active status.
To reposition a group in the list, press its move grabber ( ☰ ), then drag&drop it to the desired position.
Tap Done when finished.
The Save icon ( ) will turn black reminding you to save the changes to your device.
To reposition a message in the list, press its move grabber ( ☰ ), then drag&drop it to the desired position.
Tap Done when finished.
The Save icon ( ) will turn black reminding you to save the changes to your device.
8. Preferences
Tap the Menu ( ), then Preferences to display the app’s preferences and their settings.

- Sort Events by Status: By default the events table is sorted by event send date. Turn this switch on and they are sorted by their status.
- Send e-mail Notification: If notifications are turned on, turn this switch on if you also want to receive an e-mail informing you to send an event message when the time comes.
- 24-hour (Military) Time: By default time is 12-hour time with am/pm appended. 12am is display as “midnight” and 12pm as “noon.” Turn this switch on if you want 24 hour time. 8am is displayed as 08:00, 8pm as 20:00, noon as 12:00 and midnight as 00:00.
- European Date Format: The default date format is mm/dd/yyyy. Turn this switch on if you want European format, namely, dd/mm/yyyy.
9. Event Notifications
When the app is launched the first time, you will be asked if you want notifications turned on.
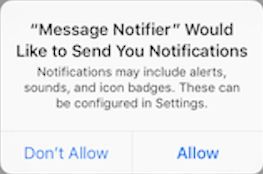
If you tap “Don’t Allow” then you will not receive any form of notification when it is time to send an event message. You will have to rely on the event’s status indicator to inform you. You can always turn a form of notification on/off in Settings; select the app under Notifications. There are 3 basic forms of notification: a notification center alert, a played sound and the badge count on the app’s icon. The badge count represents how many events are in the pending or past pending status.
If you choose to receive an alert notification for a scheduled event, the following will be displayed when it is time to send the event message:
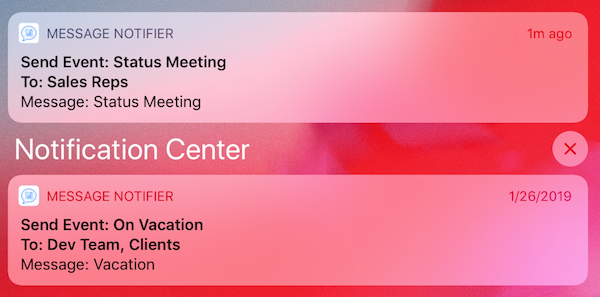
If you just tap the notification, it is dismissed and an e-mail notification is sent if the Send E-mail Notification preference is on. For security reasons, the app cannot determine your e-mail address, so you will have to fill in the To: field. If you don’t want to send the e-mail, cancel it.
If you swipe the notification left 3 options are presented. If you tap Clear the notification will be removed and no further action taken.

Tap View to display 3 actions you can take:
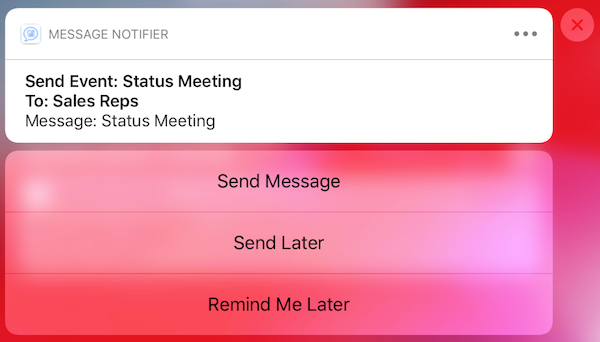
- Send Message: Tapping this action invokes Messages and prepares the message to be sent. The To: field is populated with the recipient group expanded to the recipients receivers and the event’s message. You can then choose to Cancel sending the message, send the message as is or edit the To: field, Subject field and/or message before sending. The status of the event is changed to Sent and the event is marked with the send time. The app icon’s badge count is decremented by 1.
Note: If you try to send a message and some recipients (phone numbers or e-mail addresses) are not registered with Messages, iOS prevents the message from being sent until they are corrected or removed. This behavior is different on a iPhone where iOS permits the message to be sent, but later sends a message stating it couldn’t be sent. When you tap the To: field, Invalid recipients are displayed in red, valid recipients in blue.If the sent event is a repeat event, another event is created with a send date-time based on the event’s repeat frequency. - Send Later: If the event’s status is active, the status of the event is changed to pending and the app icon’s badge count is increment by 1. If this is a snooze notification and the event’s status is pending, its status is changed to past pending.
- Remind Me Later: The Select Snooze Interval dialog is displayed. It not canceled, another notification is scheduled based on the selected snooze interval. See the section Snooze Mode for details.
10. Snooze Mode
If you decide to delay sending a message for a pending or past pending event, you can put it in snooze mode and schedule another notification based on a selected snooze interval. For a pending or past pending event, swipe left and tap the Remind option. Then tap the Snooze interval field in the displayed Select Snooze Interval dialog.
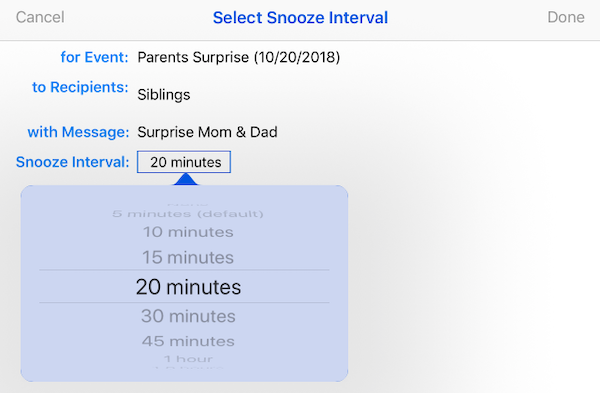
When finished tap Done. A snooze indicator (
 ) is displayed for the event in the event table (right side).
Tap the Cancel button to cancel putting the event in snooze mode.
The Save icon ( ) will turn black reminding you to save the changes to your device.
If an event is in snooze mode and you choose to take it out of snooze mode, display the Select Snooze Interval dialog as just explained and select None as the snooze interval. The scheduled notification will be canceled.
You can put a pending or past pending event into snooze mode as many times as you choose.
11. Reinstate Deleted Items
Deleted events, groups and messages can be reinstated any time in their respective table. To see the deleted items, tap the menu icon ( ) to display the menu popover; select Reinstate Deleted Items. A list of deleted items will be displayed in the right pane. The names of the items are their original names. If an item was renamed before being deleted, it will be reinstated under that name. Regardless of when the items were deleted, they are presented in alphabetical order.
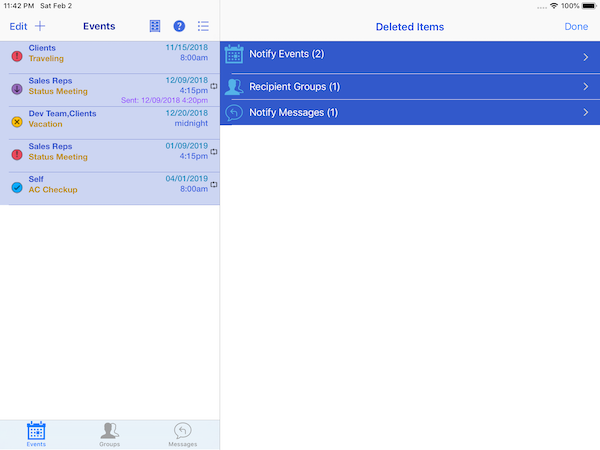
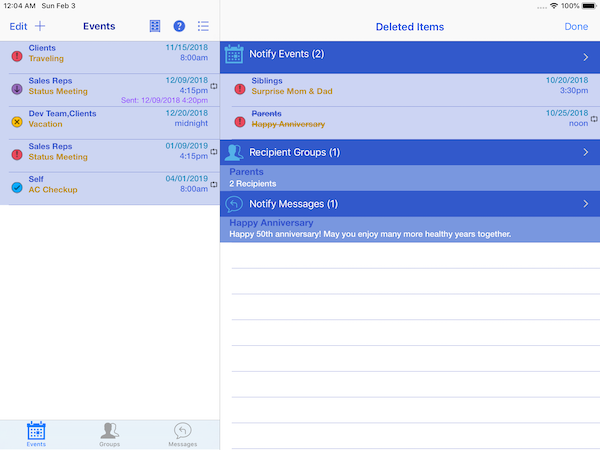
Tap the Notify Events category, Recipient Groups category or Notify Messages category to expand it and reveal their deleted items.
An entire deleted category can be permanently deleted. Swipe the category to the left and select the displayed Delete. Specific deleted items in a category can be similarly permanently deleted.
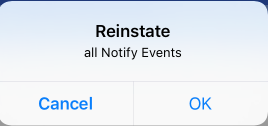
An entire deleted category can be totally reinstated by press and holding on the category. Tap OK in the confirmation dialog or Cancel to cancel the reinstatement. Specific deleted items in a category can be similarly reinstated.
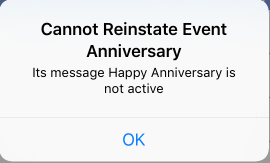
A deleted event cannot be reinstated if its recipient group and/or message is deleted. This fact is visually conveyed by the fact the name of the group and/or message has a strikethrough line through its center. The group and/or message must be reinstated before the event can be reinstated.
Reinstated events appear in the Events table based on its sort order. Reinstated groups and messages are appended to their tables unless the table is in sorted order.
If a reinstated event is in snooze mode and its snooze time has passed, it is taken out of snooze mode; otherwise, a notification is scheduled for it.
If a reinstated event is not in snooze mode and its send time has passed, its status is changed from active to pending or pending to past pending. Otherwise, a notification is scheduled for it.
These rules also apply to events restored from session state.
After reinstating or deleting deleted categories/items, the Save icon ( ) will turn black reminding you to save the changes to your device.
12. History of Sent Events
To display the history of sent events, tap the menu icon ( ) to display the menu popover; select Show Sent history.
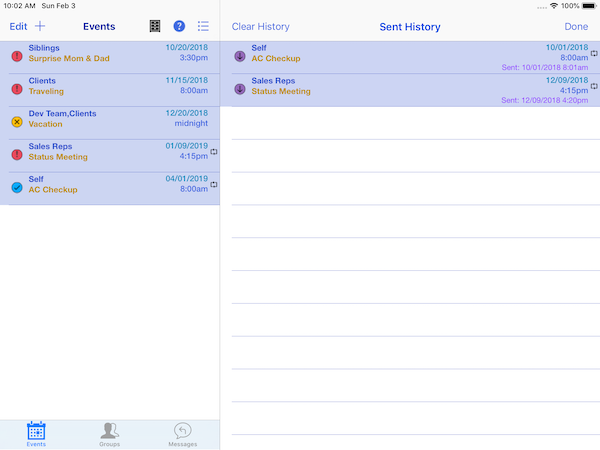
To permanently delete the entire history, tap Clear History. To delete a specific history event, swipe the event left, then tap the displayed Delete.
When finished tap Done.
After deleting sent events, the Save icon ( ) will turn black reminding you to save the changes to your device.
13. Frequently Asked Questions (FAQs)
- How do I save my changes to the Events/Groups/Messages list? Answer
- How do I restore my saved list of Events/Groups/Messages changes? Answer
- How do I add a new Event/Group/Message? Answer
- How do I edit an existing Event/Group/Message? Answer
- Can I delete an Event/Group/Message? Answer
- Can I reorder an Event/Group/Message list? Answer
- Can I rename an Event/Group/Message? Answer
- In what order should I create my events/groups/messages? Answer
- Can I reinstate an Event/Group/Message I deleted? Answer
- Can I permanently delete an event/group/message I deleted? Answer
- What are the special icon markers to the left of an event and what do they mean? Answer
- What are the special icon markers to the far left and far right of an event and what do they mean? Answer
- How do I know when it is time to send a message? Answer
- What actions can I take when an event’s alert notification is displayed? Answer
- How many ways can an event’s message be sent? Answer
- Why did an event’s status change when session state was restored? Answer
- What happens to a scheduled notification for an active event or event in snooze mode if the app is killed? If the app is relaunched and session state is restored? Answer
1. How do I save my changes to the Events/Groups/Messages list?
The first time the app is launched, there are no defined Events/Groups/Messages. When you add/edit an event, recipient group or message, you need to tap the Save icon ( ) to save the changes; otherwise, they will be lost if you exit the app. The Save icon will turn black when changes are made. Once saved the icon will turn royal blue.
2. How do I restore my saved list of Events/Groups/Messages changes?
The list of Events/Groups/Messages are automatically restored when you launch the app another time. The contents of the lists are the same as when the changes were saved.
If a restored event is in snooze mode and its snooze time has passed, it is taken out of snooze mode; otherwise, a notification is scheduled for it.
If a restored event is not in snooze mode and its send time has passed, its status is changed from active to pending or pending to past pending. Otherwise, a notification is scheduled for it.
3. How do I add a new Event/Group/Message?
- In the tab bar at the bottom of the screen, tap Events/Groups/Messages.
- Tap the + in the top left corner of the screen. An Add dialog will be displayed. Enter or select all of the Event’s/Group’s/Message’s parameters.
- When finished entering the parameters, tap Add and the Event/Group/Message will be added to its list.
4. How do I edit an existing Event/Group/Message?
- Press and hold on one of Events/Groups/Messages to edit it.
Alternatively, tap and hold an Event/Group/Message while sliding left. A teal Edit button will appear to the right of its name. Tap it to edit the Event/Group/Message. - An Edit dialog will be displayed. Tap any Event’s/Group’s/Message’s parameter to change it.
- When finished editing, tap Apply.
5. Can I delete an Event/Group/Message?
Yes, but you cannot delete a group/message used by a non-sent event. A group cannot be deleted if it is used by another group’s recipients. The deletions can be reinstated at any time.
- Tap Edit. All Events/Groups/Messages will have a delete icon ( ) to the left of its name. Tap it and a red Delete button will appear to the right of its name.Tap it to remove the Event/Group/Message.
- Alternatively, tap and hold an Event/Group/Message while sliding left. A red Delete button will appear to the right of its name.Tap it to remove the Event/Group/Message.
6. Can I reorder an Event/Group/Message list?
Events cannot be reordered. They are sorted by status or send date as determined by a preference. Groups and messages can be reordered. One reason is to put more relevant/recent groups/messages near the top. Initially, groups/messages are kept in alphabetical order by name. When a new Group/Message is added, the order of the list is maintained.
- Tap Edit. A move grabber ( ☰ ) is displayed to the far right of each group’s/message’s name.
- Press an item’s move grabber ( ☰ ), then drag&drop the list item to the desired position.
7. Can I rename an /Group/Message?
Yes. One reason is to change the name to something more meaningful and identifiable to you.
- Press and hold Event/Group/Message whose name you want to change. An edit dialog will be displayed.
- In the edit dialog, change the name and tap Apply. The new group/message name will replace all occurrences of the old name.
8. In what order should I create my events/groups/messages?
Groups and messages must be created before an event that references them is created; otherwise, they can be created in any order except when a recipient group references another recipient group that must be created first.
9. Can I reinstate an Event/Group/Message I deleted?
Yes. A list of deleted items is maintained by the app.
- Tap the menu icon ( ) to display the menu dialog. Select Reinstate Deleted Items.
- In the displayed Deleted Items dialog, expand the delete category containing the item you want to reinstate. Then press and hold on the exposed item. Tap OK in the confirmation dialog.
- To reinstate an entire category, press and hold on the category. Then tap OK in the confirmation dialog.
10. Can I permanently delete an event/group/message I deleted?
Yes. A list of deleted items is maintained by the app.
- Tap the menu icon ( ) to display the menu dialog. Select Reinstate Deleted Items.
- In the displayed Deleted Items dialog, expand the delete category containing the item you want to delete. Then swipe left on the item to be deleted. A red Delete will be displayed; tap it.
- To delete all items in a category, swipe the category left and tap the displayed red Delete.
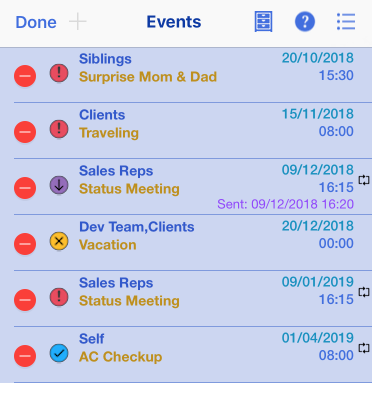
11. What are the special icon markers to the left of a event and what do they mean?
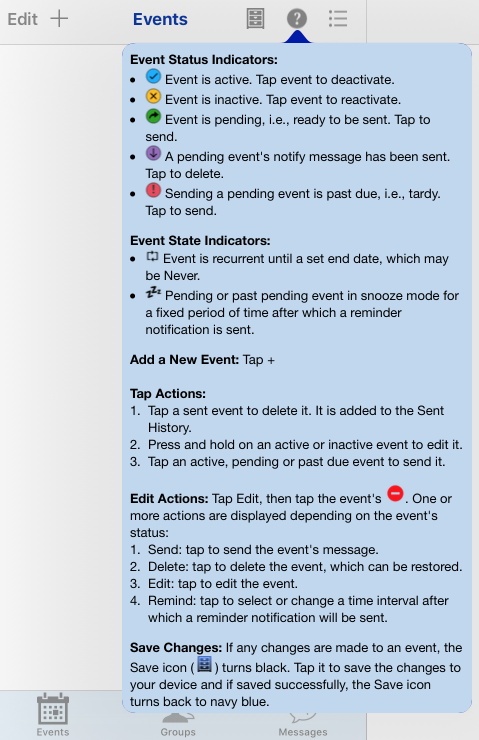
These are Event Status Indicators:
 Event is active. Tap the event to deactivate it.
 Event is inactive. Tap the event to reactivate it.
 Event is pending, i.e., ready to be sent. Tap the event to send its message.
 A pending event’s notify message has been sent. Tap the event to delete it.
 Sending a pending event is past due, i.e., tardy. Tap the event to send its message.
12. What are the special icon markers to the far left and far right of an event and what do they mean?
These are Event State Indicators:
 Event is recurrent until a set end date, which may be Never. Displayed beside the event’s date-time occurrence.
- Event in snooze mode for a fixed period of time. Displayed next to the event’s status indicator.
13. How do I know when it is time to send a message?
When the app is launched, its notifications (alert, badge, sound) are all enabled. You can turn each one off individually or all of them off in Settings. Assuming they are all enabled when the notify time comes, an alert notification will be displayed, the app’s badge count will increase by 1 and the notification sound will be played. If you turn all notifications off, you will have to rely on the event’s status icon. It will become pending ( ) or past pending ( )
14. What actions can I take when an event’s alert notification is displayed?
There are 3 things you can do:
- Swipe left on the alert notification, tap View and then tap 1 of 2 action buttons:
- Send Message: the app will open and the event’s message prepared to be sent. Tap Send.
- Send Later: if the notify time is not the default (“At time of event”), a new alert notification is scheduled for the default notify time; otherwise, the event’s status icon is changed to pending ( )
- Tap the alert notification to dismiss it. No action is taken, but if the notify time is the default (“At time of event”) the event’s status icon is changed to pending ( )
- If you swipe left on the alert notification and then tap Clear, the notification is ignored and nothing else happens.
15. How many ways can an event’s message be sent?
There are 3 opportunities when an event’s message can be sent via Messages:
- If an event’s status is pending or past pending, simply tap it.
- When the event’s send time has occurred or snooze time has ended, and an alert notification is posted, its custom Send Message action can be selected. See the section Event Notifications for details.
- If an event’s status is active, pending or past pending, Edit the Event’s table and select the event’s Send option. See here for details on editing the Events table.
16. Why did an event’s status change when session state was restored?
Because time has passed since the events were saved, their status is updated when they are restored.
- If the event’s status was active when saved and the send date has passed when restored, it is changed to pending.
- If the event’s status was pending when saved, its is changed to past pending when restored.
- If the event was pending or past pending when saved and was in snooze mode, it will be taken out of snooze mode if the snooze interval has past.
17. Will alert notifications be scheduled when session state is restored?
17. What happens to a scheduled notification for an active event or event in snooze mode if the app is killed? If the app is relaunched and session state is restored?
If the app is no longer running, the scheduled notification still occurs. The app will be relaunched if in the notification center the notification is tapped or if is swiped left, the View option is selected and one of the displayed custom actions is tapped. The app will not be relaunched if Clear is selected.
If the app is relaunched, any outstanding notifications that haven’t occurred will occur.